Sunday, September 13, 2020

Rainbow Happy Birthday

This is one of the cards we did at our September Club Meeting.  I love the contrast of the Rainbow Glimmer paper and the Black cardstock!!  What a fun birthday card for anyone!


Measurements:  

  • Basic Black: 1/2 sheet cut LENGTHWISE
  • Rainbow Glimmer (N): 1 3/8" strip
  • Melon Mambo (or other coordinating cardstock): scrap
  • Whisper White: scraps

To Make This Card:  

  • Measure 1 1/4" from bottom of folded Black card, and cut out with "Happy" die.
  • The easiest way to cut out the letters is to select an area on the Rainbow Glimmer strip and cut out all the letters at once. OR, you can select individual colors from the strip and cut out 5/8" - 3/4" squares and cut out the letters individually. A little more time-consuming, but worth the effect. Adhere the letters over the black letters on the card base.
  • Take the remaining strip(s) and cut out balloons. Both small and large dies are included.  Remember to use Odd numbers - 1,3,5,7 - for your "bouquet" of balloons.
  • Cut 1-3 "strings" from Whisper White cardstock. I also cut one small bow from the remaining Glimmer scraps.
  • Gather up your old Glitter Dots, Rhinestones, or coordinating sequins and scatter around.
Product List

Saturday, September 12, 2020

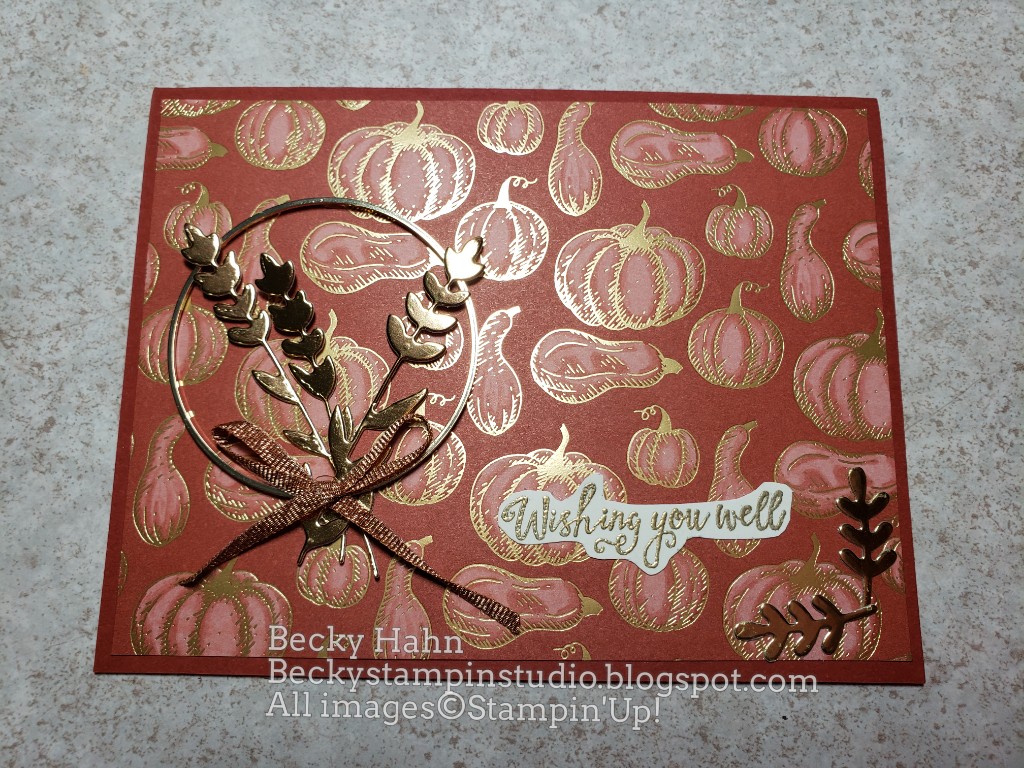
Golden Pumpkins

This gorgeous card from my monthly 5/$10 stamp class, is fast and easy to make and can be used for so many occasions.


Measurements
  • Cajun Craze: 1/2 sheet
  • Gilded Autumn DSP (N): 4" x 5 1/4
  • Brass Foil (N): scraps
  • Very Vanilla: scraps

Product List

Friday, September 11, 2020

Love You More Than...Fall

I loved the look of this card designed by Libby Fens. Love the paper piecing, loved the colors, loved the plaid, loved the sentiment, just LOVE it!

 Measurements:  

  • Blackberry Bliss: 1/2 sheet, 1 1/2" x 3"
  • Fall Plaid (N): 2 1/2" x 4", 1 1/8" x 2 1/8"
  • Very Vanilla: 1 3/4" x 2 1/2", 1 1/8" x 2 1/8"
  • Pumpkin Pie: 2" x 2 1/2", scraps
  • Bumblebee (N): scraps
  • Cajun Craze: scraps

To Make This Card:  

  • Fold Mint Macaron card in half. Trim 1 1/2" from bottom edge of card front, then 2" from the remaining front. This 2" piece is the "tag" for the "bridge".
  • Attach DSP pieces to top 
Product List

Thursday, September 10, 2020

Mint Macaron Cut Apart Card

Today's Fun Fold Friday card comes courtesy of Julie Davison's Thursday Therapy, again! I love her fun classes! The design, however, is totally mine!  Love the Gilded Autumn DSP and the foil accents with the Mint Macaron Color!


Measurements:  

  • Mint Macaron: 1/2 sheet cut LENGTHWISE
  • Soft Seafoam: 4" x 5 1/4
  • Gilded Autumn (N): 1 3/4" x 4", 1 1/4" x 4"
  • Copper Foil: 1 3/4" square
  • Brass Foil (N): scraps

To Make This Card:  

  • Fold Mint Macaron card in half. Trim 1 1/2" from bottom edge of card front, then 2" from the remaining front. This 2" piece is the "tag" for the "bridge".
  • Attach DSP pieces to top and 1 1/2" pieces accordingly.
  • Take 2" piece for the "bridge" and punch with tag topper of your choice. Attach "wheat" in Brass Foil cut from Sunflowers Dies and one "maple leaf" die cut from Copper, and one from the Brass Foil to this "tag".
  • Place Dimensionals on the 4 corners of the back of the "tag".
  • Close the top of the card. Hold 1 1/2" strip along bottom, completing card.  Attach "tag" to upper and lower pieces, "bridging" the 2 pieces together.
  • Finish by coloring a piece of Metallic Trimmed Ribbon with Dk Mint Macaron Blend, and stamp greeting in Mint Macaron in "opening".
Product List

So Much Happy Ideas

I was playing with the bundle - SO MUCH HAPPY - that I am using in Stamp Club this month, and came up with these fun and easy ideas that I wanted to share with you!!  Just the Happy dies, Well Written dies (birthday script) and your fav DSP!! Everybody sends Birthday cards, this bundle is AMAZING!!!


Products Used: 

  • Flowers for All Seasons DSP/Playing with Patterns DSP
  • Coordinating Ribbons and Embellishments
  • Coordinating inside cardstock

To Make This Card:  

  • Select DSP you would like to use and select a coordinating cardstock base. Then, determine your orientation.
  • If, you choose to do a vertical cut card, you will need to use a LENGTHWISE cut base (Just Jade card).  Then you decide if you want to cut straight or at a diagonal. Or, cut clear through, or make it an additional piece (Misty Moonlight card).
  • There are other border pieces (see Misty Moonlight "cloud"). And, banners, and stitching (see Misty Moonlight "edge").

Product List