Tuesday, November 30, 2021

Doily & Snowflakes in Purple

I saw a version of this card in Pacific Point, but I wanted to try in in cool purples! I love how it turned out! Such a nice combination of the wintry Snowflake Dies with the Encircled in Beauty doilies!


Measurements:  

  • Gorgeous Grape: 1/2 sheet cut LENGTHWISE
  • Shimmery White: 4" x 5 1/4", 1 1/2" square
  • Highland Heather: 2 1/4" square
  • Fresh Freesia: 2" square
To Make This Card:
  • Cut the largest "doily" from the Shimmery White piece,WITHOUT the outside edge. Carefully remove the little pieces.  This opening is very delicate
  • Attach this piece to folded Gorgeous Grape card.
  • Cut smallest "snowflake" from scrap of Shimmery White.
  • Cut next size from Fresh Freesia.
  • And the largest from Highland Heather.
  • Assemble all together and attach inside circle of doily with Mini Dimensional.
  • Stamp sentiment in Gorgeous Grape ink.
  • Finish with purple retired "Peacock" rhinestones. Or, color some Basic Rhinestones with Gorgeous Grape Blend.
Product List

Monday, November 29, 2021

Joy Fold Gift Card Holder

I am getting ready for my Gift Card Holder class next month.  This is a design that I haven't tried  before.  It's a Joy Fold card turned into a Gift Card Holder. I usually make several ideas, and choose them later...  I do like how nicely this one is coordinated!  Join me for class the 3rd week of December!


Measurements:  

  • Real Red: 1/2 sheet cut LENGTHWISE, 3" x 8"
  • Old Olive: 2 1/2" x 4"
  • Basic White: 2 1/2" x 4", 1 7/8" x 3"
  • Gingerbread & Peppermint DSP (N): 4" x 5 1/4" (sm peppermints), 2 1/2" x 4" (lg peppermints), 3" square (stripe), die cut "mints", die cut snowflake
To Make This Card

  • Fold large Real Red piece in half. Trim 2 3/4" from front flap.  You will not need this piece for this card.
  • Attach Small Peppermint piece to inside.
  • Attach Large Peppermint print side to front flap.   
  • Fold small Real Red piece in half.  Adhere to inside of card with the fold to the RIGHT.
  • Cut a Stitched Scalloped Rectangle from Old Olive. Attach to the front of this smaller folded card.
  • Cut the same size from Basic White.  Attach this to the inside.
  • Stamp sentiment in Real Red onto smallest piece of white.  Cut out with smaller Stitched Scalloped Rectangle. Adhere to front over Old Olive.
  • Take 3" square of DSP and cut a half circle with the Layering Circle Dies along one side. Attach to the inside of the smaller, red card.  I used 1/8" Tear & Tape around 3 sides.
  • Die cut mints from the Large Peppermint DSP using coordinating die.  Also cut out one "snowflake" of your choice.
  • Take one large "mint", place Mini Dimensionals along one side, close smaller red card into place, and attach the "mint" to help keep the smaller card closed.  Note: You might want to strengthen this piece by mounting it on a piece of cardstock. 
  • Decorate the front of the small, red card with peppermints, pop up a couple with Dimensionals.  Also, add a few Red Rhinestones.
  • Don't forget to decorate the inside!  I placed 3 "mints" inside, and the die cut "snowflake" onto the Gift Card "Pocket".  Also decorate the inside with Red Rhinestones.
Product List

Sunday, November 28, 2021

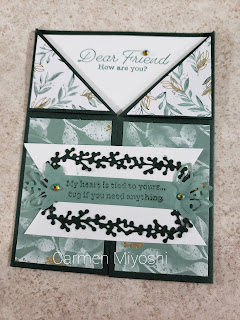
Eden's Garden Gate Fold with a Twist

Today's card comes to you thanks to Carmen Miyoshi, one of my dear friends and Stampin' Up! Demonstrators.  She is SO creative.  She made this card using the Eden's Garden Bundle, including the Cotton paper!  I love her easy twist on the basic gate fold!  I need to give it a try. Directions/Supplies based on her "original" version.

Her original version in Evening Evergreen.


Her alternate, club version:

Measurements:  

  • Evening Evergreen: 1/2 sheet
  • Basic White: 4" x 5 1/4"
  • Ever Eden DSP (N): 2 pcs @ 1 7/8" x 3 1/8"
  • Ever Eden Cotton Paper (N): 2 pcs @ 1 5/8" x 2 7/8"
  • Gold Foil: 1 1/4" x 4" strip, scraps
  • Soft Succulent: 1 1/4 " x 4 1/4"
To Make This Card

  • Score card base Evening at 2 1/8".  Turn and score other end at 2 1/8".  Crease.  The cut edges should meet in the middle.
  • Turn the top corners of each "gate" back so that the top edge is flush with the fold. Look at the samples above.  Note: Each cut edge will measure 2 1/8". Attach corners to front of card with Mini Glue Dots.
  • Attach DSP to both front flaps.  Adhere Basic White piece to inside.
  • Emboss "sprigs" in Gold Embossing Powder onto Cotton paper. When cooled, crumple up the paper and smooth out, creating a Faux Silk look!  Attach over DSP on front flaps.
  • Cut 2 "branches" and 1 "border" from Gold Foil.  Attach "branches" to flaps, and "border" to inside of card.
  • Stamp sentiment in Evening Evergreen, onto piece of Soft Succulent.  Die cut with coordinating "label" die.
  • Attach strip of gold behind the straight edge. Attach 1/2 to left flap of card.
  • Close card, and center greeting on the inside White.  Stamp with Evening Evergreen ink.
  • Finish with Garden Gems. They work perfectly with the detail on the "label".
Product List

Saturday, November 27, 2021

Peaceful Place DSP Bay Window Fold (basic gray)

Here is another Bay Window card that I created using just a DSP border! This one uses the Basic Gray Border Trees piece of DSP. All you do is trim the 12x12 piece above the tree tops, split into pieces, adhere, and go!  I LOVED using this piece in this manner! I had quite a few, as I haven't used it, yet. It took me a while, but decided this was how I wanted to use it in this card design.  Video is over on my YouTube channel that shows you how to chop it up!


Measurements:  

  • Basic Gray: 4 1/4" x 11" (cut LENGTHWISE)
  • Basic White: 4" x 5 1/4", scrap
  • Peaceful Place DSP: Basic Gray Tree Border, tree scraps

To Make This Card 
  • Score Basic Gray base at 3/8" - 1 7/8" - 3 5/8" - 5 1/8" - 5 1/2".  Fold card in half. Beginning at the outside cut edge, fold 3/8" score line up ("valley"), the next 2 crease as ("mountains"), and the last little bit fold up ("valley").  Or, look a pix above. Crease well.
  • Attach White layer to the inside of your card. 
  • Place Tear Tape on the inside of the 1/4" by the fold.  Attach this area to the card, like a Book Binder card.
  • Cut 12x12 piece almost in half, across the tree tops just missing the tallest tree. Then, trim the bottom so the piece measures 4" tall.
  • Now, starting from the left side, cut this piece at 1/4" - 1 1/4" - 1 1/2" - 1 1/4" - 1/4". Set the extra piece aside. You can use it on the inside right of the card.
  • Beginning on the left side, adhere the pieces in order, ending with the right narrow strip.  Too neat, right!
  • Now, take left overs  and fussy cut one large  tree for the inside.  
  • Then, on the inside, I attached the remaining piece of DSP. 
  • I stamped the sentiment from Merriest Moments in black, and cut out with the center section of the rectangle Picture This dies!  I then attached it over the trees with Dimensionals on the far right. (My Mom saw this and suggested putting Dimensionals on the DSP piece and tuck the edge under it.  I like that better!)
Product List