Showing posts with label Eden's Garden. Show all posts

Sunday, February 27, 2022

Eden's Garden Diagonal Joy Fold

This is my final sampler using this awesome fold....for now. This version is my version of a sample that I saw using this fold.  Again, I turned to one of our gorgeous DSP papers.  Unfortunately, this DSP is retired, but I know many of you already have it! Instead of the Stitched Greenery for the background, I utilized the gorgeous border dies, that a still available!  I was very pleased with how this turned out!


Measurements:  

  • Soft Succulent: 1/2 sheet, cut LENGTHWISE, 3" x 8"
  • Basic White: 2 3/4" x 3 3/4", scrap
  • Ever Eden DSP (ret): 4" x 5 1/4", 2 3/4" x 3 3/4"
  • Brass Foil (ret): 1 1/2" strip
  • Evening Evergreen: scrap
To Make This Card:

  • Fold Soft Succulent base in half.  Cut diagonally from upper right corner, to lower left point.  Discard the lose piece.
  • Now, take DSP and also cut diagonally, as shown. Attach one piece to the card front. 
  • Fold the 3" x 8" piece in half. 
  • Stamp the White piece with selected images. And adhere to the inside of this "2nd card".
  • Add the DSP piece to the front of this "mini card". 
  • Cut "label" and 2 "borders" from Gold/Brass Foil.
  • Attach the "label" to the front of the "mini card".  It was too long, so I cut it in half, removed about 3/8" and adhered it to fit.
  • Then, I stamped a sentiment from the set in Evening Evergreen, and mounted it onto a scrap of Evening Evergreen cardstock, and attached it over the "label" with Dimensionals.
  • Trim 2 border pieces so the stitching just shows.  Attach one to the top, and one to the right side.  I mitered the corner after the "mini card" is attached, so leave the borders overlapped at the corner.
  • Next, take this "mini card" and securely attach to inside of base.  
  • To close the card, Fold in the diagonal flap and then the "mini card" front.
  • Now, to miter the corner, take a ruler an draw a line from the point of the "mini card" to the point of the main card.  Get in there with your paper snips and cut diagonally.  They don't need to meet, just be cut at an angle.
  • Finish Gilded Gems

Product List

Friday, December 17, 2021

Eden's Garden Pop Up/Pull Out Card + Video

Oh, my!  I saw this card done on Lisa Curcio's YouTube Channel, and JUST KNEW that I had to try it!  An old stamper still learning new things!! This is a fun, interactive card that is easier to do than you think!  The secret is the Pop Up mechanism!! 


Measurements:  

  • Soft Succulent: 5 1/4" x 9 3/4" (base), 3 3/4" x 7 1/2" (inside), 2 1/2" square (mechanism)
  • Ever Eden DSP: Print #1 - 4" x 4" (top): Print #2 - 2 3/4" x 3 1/2" (top, inside), 3 1/2" x 4 1/4" (bottom, inside); Print #3 - 1 1/4" x 4" (bottom, outside)
  • Basic White: 2 1/4" x 3 1/4", 2" x 3 1/4"
  • Gold Foil: 2" x 3 1/4",  1" x 3 1/4"
To Make This Card:

  • For the base, score at 4 1/4", then turn and score at 1/2" on each long end. Crease well with bone folder.
  • Next, you will need to remove the cardstock from the longer side of each 1/2" side starting at the bottom, and cutting up to the score line, then cut along the score line.  Discard this piece.  For ease in attaching later, cut a small "wedge" away from the fold to the outside edge.  This eliminates bulk up at that corner.  I do this frequently to eliminate bulk!
  • Fold down into place, and attach 4" square of DSP to the "front".
  • Next, let's work on the "insert".  Score this piece at 3". Crease well with bone folder.
  • Attach smaller piece of DSP to the "top", and larger inside piece of DSP to the inside. You'll also add the White inside.  To do this, line up the shorter, cut edge about 1/4" from the crease.  Any lower, and you might see it. If you know what you want to stamp, you might stamp this now, while it's flat!
  • Now, we'll work on the "mechanism".  Score the 2 1/2" square at 3/8" on 2 opposite sides.  Crease well. 
  • You will want to "break the fibers" in this piece to it moves easier.  To do this, take your bone folder and curl the cardstock in the direction of your score lines. Do this several times, or until it starts to curl (like your curling ribbon would!)
  • Place Tear & Tape on each 3/8" section. Remove ONE cover.
  • Next, take the insert piece and fold it into position.  Flip over the "mechanism" and place the cut edge with the adhesive even with the top crease of the inside piece, centering it.  Press into place. Flip this piece up, so you now see the other 3/8" edge with the score tape.
  • Now, grab the "base/outside" piece. Open up the flap.  Slip the "insert" inside with the mechanism "up".  Remove the Tear & Tape cover. Close the top flap so that the bottom cut edge of the FLAP is even with the crease of the mechanism.  Close securely.  The other 3/8" will now be adhered to the base flap, around the center.
  • To create the "pocket", flip open the "base".  Flip up the insert. Wrap the 1/2" pieces around the insert, creating a pocket.  Place Tear & Tape on the 1/2" extensions, remove covers and close the bottom up and into place. Now, give it a try!!  
  • Oh, it sticks a bit doesn't it.  It's catching on the edges of the "pocket". So, we will take the remaining piece of DSP and attach it to the bottom and over the edges.  To do this, pull the insert out all they way.  Put adhesive on the strip.  Attach to the bottom of the base, leaving an 1/8" around the bottom edges, and just catching the "pocket" edges.  Shove it into place.  Now, give it a pull.  It should would smoothly!!
  • I decided that it might be a little difficult for the recipient to know what to "do" with this card!  So, I decided to add a little "pull" to this one!  Punch a place to thread a small piece of ribbon.  A hand punch works best!
  • Finish decorating the front of the card, and the white piece inside!.
Product List

Sunday, November 28, 2021

Eden's Garden Gate Fold with a Twist

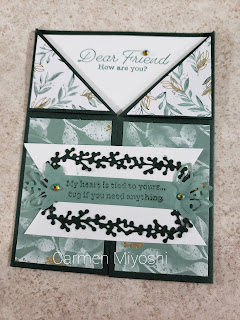
Today's card comes to you thanks to Carmen Miyoshi, one of my dear friends and Stampin' Up! Demonstrators.  She is SO creative.  She made this card using the Eden's Garden Bundle, including the Cotton paper!  I love her easy twist on the basic gate fold!  I need to give it a try. Directions/Supplies based on her "original" version.

Her original version in Evening Evergreen.


Her alternate, club version:

Measurements:  

  • Evening Evergreen: 1/2 sheet
  • Basic White: 4" x 5 1/4"
  • Ever Eden DSP (N): 2 pcs @ 1 7/8" x 3 1/8"
  • Ever Eden Cotton Paper (N): 2 pcs @ 1 5/8" x 2 7/8"
  • Gold Foil: 1 1/4" x 4" strip, scraps
  • Soft Succulent: 1 1/4 " x 4 1/4"
To Make This Card

  • Score card base Evening at 2 1/8".  Turn and score other end at 2 1/8".  Crease.  The cut edges should meet in the middle.
  • Turn the top corners of each "gate" back so that the top edge is flush with the fold. Look at the samples above.  Note: Each cut edge will measure 2 1/8". Attach corners to front of card with Mini Glue Dots.
  • Attach DSP to both front flaps.  Adhere Basic White piece to inside.
  • Emboss "sprigs" in Gold Embossing Powder onto Cotton paper. When cooled, crumple up the paper and smooth out, creating a Faux Silk look!  Attach over DSP on front flaps.
  • Cut 2 "branches" and 1 "border" from Gold Foil.  Attach "branches" to flaps, and "border" to inside of card.
  • Stamp sentiment in Evening Evergreen, onto piece of Soft Succulent.  Die cut with coordinating "label" die.
  • Attach strip of gold behind the straight edge. Attach 1/2 to left flap of card.
  • Close card, and center greeting on the inside White.  Stamp with Evening Evergreen ink.
  • Finish with Garden Gems. They work perfectly with the detail on the "label".
Product List

Sunday, November 14, 2021

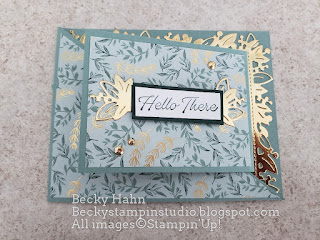
Eden's Garden Faux Side Fold

So, this is the last of the Faux Side Fold cards that I am sharing with you, at the moment.  This was actually the FIRST one that I did!! I was hooked!  The ideas kept swirling around in my head! I hope you will give it a try.  I shared this one on my video, too.


Measurements:  

  • Soft Succulent: 5 1/2" x 8", 3" x 6"
  • Ever Eden DSP (N): 3/4" x 5 1/4", 2 3/4" x 5 1/4", 1" x 6"
  • Basic White: 2 3/4" x 4", 2 3/4" x 5 1/4", scraps

To Make This Card:
  • Score largest Soft Succulent piece along 8" side at 3" - 6" - 7".  Accordion fold as shown. Crease well.
  •  Attach 3/4" x 5 1/4" piece to "bottom". Skip an area, and attach larger piece to the next area.
  • Now, take the 3" x 6" piece and score along 6" side at 4 1/4". Crease well.
  • Stamp "floral sprig" in Soft Succulent onto center of 2 3/4" x 4" piece. Punch 2 corners with the decorative corner from the Trio Punch.  Attach to front of 3" x 6".
  • Now place Tear & Tape, on the wrong side of this piece at the bottom, and top.  Remove covering and place even with the lower edge. Remove the over covering, fold the card flat, and attach to the back of card.
  • Run the 1" strip of DSP through the Eden Dies "border".  Attach to inside bottom of card.
  • Stamp and emboss, in gold, small sentiment.  Cut out with small die from Ornate Frames.  Attach to card as shown.
  • Finish with scattered Genial Gems, and a Soft Succulent Open Weave bow

Product List