Monday, February 28, 2022

Clean & Simple "Love It, Chop It" DSP Card

I received this card design at my Demo meeting a week ago, from friend and fellow demonstrator, Tracy Fazzio!  I thought it would be PERFECT for my card class at the Care Center! So, grab your favorite DSP, (preferably one with 2 nicely corresponding sides) and a trimmer and give this a try! Kyle Bertucci, demonstrator from Australia, has labeled this type of card a "love it chop it" card. (For those of us that have trouble chopping up that GORGEOUS DSP!)  So, stay tuned for more "Love It, Chop It" inspiration!!  Thanks for sharing, Tracy!!
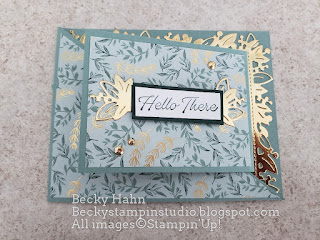
My version:


Tracy's Inspiration:


Measurements:  

  • Bermuda Bay: 1/2 sheet
  • Sunshine & Rainbows DSP ( SAB): 2 pcs @ 4" x 5 1/4" (mine),                                       1 pc 4" x 5 1/4" (Tracy's)
  • Basic White:  4" x 5 1/4" (inside), scrap
To Make This Card:

  • For my version, begin by attaching one DSP to folded Bermuda Bay card.
  • Now, use your Paper Trimmer to cut the DSP diagonally. Turn DSP, with cut edges matching (try lightly taping on the wrong side with removable tape) and cut diagonally from the other points. You will need to do this for either version.
  • For my version: select 2 opposing pieces and attach to card front over DSP. Toss the other 2, or use them for another card!
  • Stamp sentment onto scrap of white. Punch out with Everyday Label Punch.  Attach to card front over "criss-cross" with Dimensionals.
  • Add White quarter to inside.  Stamp sentiment in Bermuda Bay.
  • Finish with coordinating bow.
         For Tracy's version:
  • You will use the DSP layer as your front.  
  • Fold the base. Take the diagonal cut DSP and rearrange onto card front, flipping and fitting the pieces together like a puzzle!  Pretty cool, huh.  Tracy's DSP was really nice on both sides, so this way worked great for hers!
  • Finish her version, as I did mine!
Product List

Sunday, February 27, 2022

Eden's Garden Diagonal Joy Fold

This is my final sampler using this awesome fold....for now. This version is my version of a sample that I saw using this fold.  Again, I turned to one of our gorgeous DSP papers.  Unfortunately, this DSP is retired, but I know many of you already have it! Instead of the Stitched Greenery for the background, I utilized the gorgeous border dies, that a still available!  I was very pleased with how this turned out!


Measurements:  

  • Soft Succulent: 1/2 sheet, cut LENGTHWISE, 3" x 8"
  • Basic White: 2 3/4" x 3 3/4", scrap
  • Ever Eden DSP (ret): 4" x 5 1/4", 2 3/4" x 3 3/4"
  • Brass Foil (ret): 1 1/2" strip
  • Evening Evergreen: scrap
To Make This Card:

  • Fold Soft Succulent base in half.  Cut diagonally from upper right corner, to lower left point.  Discard the lose piece.
  • Now, take DSP and also cut diagonally, as shown. Attach one piece to the card front. 
  • Fold the 3" x 8" piece in half. 
  • Stamp the White piece with selected images. And adhere to the inside of this "2nd card".
  • Add the DSP piece to the front of this "mini card". 
  • Cut "label" and 2 "borders" from Gold/Brass Foil.
  • Attach the "label" to the front of the "mini card".  It was too long, so I cut it in half, removed about 3/8" and adhered it to fit.
  • Then, I stamped a sentiment from the set in Evening Evergreen, and mounted it onto a scrap of Evening Evergreen cardstock, and attached it over the "label" with Dimensionals.
  • Trim 2 border pieces so the stitching just shows.  Attach one to the top, and one to the right side.  I mitered the corner after the "mini card" is attached, so leave the borders overlapped at the corner.
  • Next, take this "mini card" and securely attach to inside of base.  
  • To close the card, Fold in the diagonal flap and then the "mini card" front.
  • Now, to miter the corner, take a ruler an draw a line from the point of the "mini card" to the point of the main card.  Get in there with your paper snips and cut diagonally.  They don't need to meet, just be cut at an angle.
  • Finish Gilded Gems

Product List

Saturday, February 26, 2022

Artistically Inked Diagonal Joy Fold

I knew that this Fun Fold would be awesome featuring our gorgeous DSP.  It was fun to go back through my older DSP to create this "Becky Original". I think it turned out beautifully! I selected the Expressions in Ink DSP and its' coordinating Artistically Inked stamp set.  Added an embossed sentiment and some Gilded Gems and Polished Pink ribbon...and it's just stunning, if I say so myself!


Measurements:  

  • Magenta Madness: 1/2 sheet, cut LENGTHWISE, 3" x 8"
  • Basic White: 2 3/4" x 3 3/4"
  • Expressions in Ink: 4" x 5 1/4", 2 pcs @ 2 3/4" x 3 3/4"
To Make This Card:

  • Fold Magenta base in half.  Cut diagonally from upper right corner, to lower left point.  Discard the lose piece.
  • For this version, I ran the back of the card base through the Stitched Greenery Die.  It's just a stunning addition!
  • Now, take DSP and also cut diagonally, as shown. Attach one piece to the card front. 
  • Fold the 3" x 8" piece in half. 
  • Stamp the White piece with selected images. And adhere to the inside of this "2nd card".
  • I cut 2 DSP pieces. I used the one that worked the best to add an embossed sentiment on the front, and put the other inside.
  • Now, take this "mini card" and securely attach to inside of base.  
  • To close the card, Fold in the diagonal flap and then the "mini card" front.
  • Finish with a Polished Pink bow and Gilded Gems
Product List

Thursday, February 24, 2022

Diagonal Joy Fold + Video

I found this twist on TWO card folds made into one!  It combines a Diagonal (or Triangle Flip) Fold card with a "Joy" Fold. I found a pretty DSP with a coordinating stamp to make this "Becky Original"! But, you could also make it and focus on a fun label and sentiment, too! This will be my Fri-yay video tomorrow.  So, stay tuned!!


 Measurements:  

  • Pool Party: 1/2 sheet, cut LENGTHWISE, 3" x 8"
  • Basic White: 2 pcs @ 2 3/4" x 3 3/4"
  • Friendly Hello (N) (SAB): 4: x 5 1/4" 
To Make This Card:

  • Fold Pool Party base in half.  Cut diagonally from upper right corner, to lower left point.  Discard the lose piece.
  • Take DSP and also cut diagonally, as shown. Attach one piece to the card front. 
  • Fold the 3" x 8" piece in half.  Place one White piece inside.  Stamp with coordinating, smaller stamp, if desired.
  • Next, take the other White piece and stamp coordinating images and sentiment in Memento Black.
  • Lightly color with Pool Party Blends.  Attach to front of smaller card. 
  • Now, take this "mini card" and securely attach to inside of base.  
  • To close the card, Fold in the diagonal flap and then the "mini card" front.
  • Finish by coloring Clear Rhinestones with Pool Party Blend, or, wait for our Ocean Rhinestones coming March 1st and use the Pool Party ones!
Product List