Monday, September 21, 2020

BIGGEST STAMP SALE OF THE YEAR!!

Hello, Stampin' Friends! I just wanted to give you a heads up on our BIGGEST SALE of the year that is happening ALL DAY THIS WEDNESDAY, SEPTEMBER 23. It is for ONE DAY ONLY, so don't miss out. Grab your wish lists and peruse the catalog to see if any of your favorites are on the list at a 15% discount! (it's not letting me post the list here, so check my other sites)

Then, on Wednesday, either place your order in my online store, or email your order to me. I am subbing this week, so I won't be checking until mid-afternoon!
Happy Shopping! Let me know if you have any questions!


Saturday, September 19, 2020

Arrange a Wreath Set Sampler Class

Here are the samples for my September Set Sampler Class using the awesome Arrange a Wreath Bundle!  There are SO MANY POSSIBILITIES!! It's such a versatile set!  It's not just for seasonal giving! And, what's even better, it makes a perfect TO GO option, as there is little to no stamping!! Contact me by Monday, September 21st for your kit.  Class is Wednesday afternoon or Thursday evening.  Contact me for more details, or to register for class.  Class size is limited!


Moose in the Woods

Love this card that uses 2 of my favorite returning sets - Rustic Retreat (AC) and Merry Moose (HC). We did this card in this months' 5/$10 class.  Super great for a guy!!


Measurements:  

  • Cherry Cobbler: 1/2 sheet
  • Shaded Spruce: 3 1/4" square
  • Very Vanilla: 3 1/4" x 5 1/4", 3 1/8" x 5 1/4" (inside), 2 3/4" square
  • Soft Suede: 2" strip
  • Plaid Tidings(N): 7/8" x 5 1/4"
To Make this Card:

  • Trim 3/4" from front of folded Cherry Cobbler card. Attach DSP to inside right edge, and smaller Vanilla piece to inside next to cut edge of DSP.
  • Run EF along left side of larger Vanilla piece.  Attach to front of card.
  • Stamp "cabin" in black ink. Cut out with Stitched Circle.  Color in with Watercolor Pencils and Blender Pen, as shown. Attach to Shaded Spruce circle.
  • Stamp "moose" in black ink.  Punch out with coordinating punch. Attach to circle where desired, then attach to card.
  • Finish with a knot of Cherry Cobbler ribbon.
Product List

Friday, September 18, 2020

Plaid Leaves Fun Fold!

Ok.  So, I DO have a Fun Fold ready to post!!  This is one of the cards we did this month in my 5/$10 card class as well! I use this fold a lot, as it is awesome, easy, and looks great!


Measurements:  

  • Rich Razzleberry: 1/2 sheet, 2 pcs 3 1/8" x 4 3/8"
  • Sahara Sand: 4" x 5 1/4", 2" x 5 1/4"
  • Plaid Tidings(N): 2 1/2" x 3 3/4"
To Make this Card:

  • Fold the Rich Razzleberry card in half, and then fold the front back in half, again, on itself, as shown.
  • Attach Sahara Sand quarter to the inside.  Run the Sahara Sand strip through the Tasteful Textures Embossing Folder (one of my favorites - this is a "must have"!!)
  • Cut 2 large Stitched Scallop rectangles from the 2 pieces of Rich Razzleberry. Set one aside.  With the other one, cut 3 staggered "leaves" using the leaf from the Stitched Leaves Dies. Adhere the Plaid DSP to the back of this piece.  Then, attach the remaining piece to the back to hide the backside of the Plaid piece. Attach half of this piece to the "flap" of the card front.
  • Finish with a couple of scattered die cut leaves and a little scattered bling.  (I used sequins).
Product List

Cabin in the Woods

Good Morning, Stampers!  

Sorry my scheduled post didn't load yesterday, I'll have to see what's up with that.  I was off on my first substituting job since "Covid School" started.  Trinity has their act together!!  Everything went very smoothly! I don't care for wearing a mask "all day", however! I can appreciate those that do!  Enjoy! 

Oops!  Guess it's Fun Fold Friday!!  Will see what I have ready to load!! 

Here is one of the cards that we did last week at my 5/$10 class.  It's a clean and simple card, using my favorite Fall Plaids, that's great for guys, too!!


Measurements:  

  • Bumblebee (N): 1/2 sheet, 2 3/4" x 4"
  • Very Vanilla: 4" x 5 1/4", 2 1/8" x 3"
  • Plaid Tidings(N): 3 3/4" x 5"
To Make this Card:

  • Adhere layers to folded Bumblebee Card.
  • Stamp "cabin", first, in Soft Suede onto smaller piece of Vanilla. Apply "mask" over cabin image and stamp "trees" in Early Espresso. Add "leaves" in trees and on ground with Bumblebee, Pumpkin Pie, and Cinnamon Cider inks. Cut this piece out with medium Stitched Oval.  Adhere to larger Bumblebee Stitched Oval. Attach to card with Dimensionals.
  • Finish with knot of Vanilla trim 
Product List

Wednesday, September 16, 2020

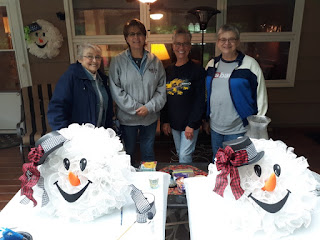
So, my sister, Cyndi, had us over last Friday afternoon on her porch! We were to wear "work" clothes and bring, a large pair of kitchen scissors, a spatula, a ruler, a glue gun, and a hat. An interesting collection of things to bring!! Mom was to bring her Kindle, or something to work on.  Oh, and she would provide food and drinks. So, what did she have planned for us??  This absolutely DARLING snowman wreath that we had been wanting to do together!! Happy Birthday to us!  We had a blast! And, she had an awesome feast, as usual!


Monday, September 14, 2020

Fall Tuck Flap Card

Fun Fold we did in our September Club Meeting. This is the Fall version of the Friday Fun Fold from last week. This uses new DSP and Embossing Folder, with a returning Stamp Set!


Measurements:  

  • Cajun Craze: 1/2 sheet, 3 1/2" square, 2 1/2" x 3 5/8"
  • Very Vanilla: 4" x 5 1/4", 2 1/8" x 2 3/4"
  • Gilded Autumn (N): 2" x 5 1/4"
  • Gold Foil: 2 1/2" x 3 1/4", 1 1/2" square

To Make This Card:  

  • Attach DSP to front of folded Cajun Craze card.  Trim with PaperTrimmer 1/8" away from edge of DSP.
  • Score 3 1/2" Cajun Craze square at 3/4". Crease well.
  • Center 3/4" flap along inside of Vanilla inside piece. Adhere all to inside of card.
  • Run Gold Foil through Embossing Folder and attach to flap
  • Cut large "label" from Cajun Craze, and smaller "label" from Very Vanilla. Sponge "splatter" in Cajun Craze onto Vanilla "label". Adhere together.
  • Emboss "pumpkin" in Gold onto Gold Foil square.  Cut out with coordinating die. Attach to Vanilla "label".
  • Fold "flap" into position.  Place Dimensionals onto left end of "labels", attach to card so that "flap" is tucked under labels and clears the Dimensionals.
Note: You many use ANY tag, label, or punch for the closure. It just needs to be 3 1/2" long.

Product List