Monday, December 18, 2023

One Horse Open Sleigh Shadow Box

 I saw this interesting sample with the Grassy Grove Tree Dies, cut in a circle on the inside of a Shadow Box card! It wasn't as easy as I thought, but I still love the final effect! It, once again, uses the One Horse Open Sleigh DSP with the Red A-Frame House. Add a couple deer from the Grassy Grove Bundle,  and you have a fun card!

Measurements:  

  • Basic White: 2 - 1/4 pcs (shadow box), 1/4 pc (for Grassy Grove)
  • One Horse Open Sleigh DSP : 3 1/2" x 4 1/4" (choose focal point), 2 strips 1/2" x 4 1/4" (one continues from scenery on left, and one from the scenery on the right), red piece 1 1/8" x 2" (sentiment)
  • Basic Black: scraps
To Make This Card:

  • Score both "shadow box" pieces at 1/2" - 1" from each end. Fold, creating a "valley" fold on the ends of each piece.
  • Take one piece and die cut a 3" stitched circle from the center portion of the card.  This will be the front.
  • On the other piece of the "shadow box", attach the DSP to the center, inside section.
  • Die cut the 2 "deer" from black and set aside.
  • Die cut the "Grassy Grove" from the last quarter piece of White.
  • Cutting this die cut into a circle is a little tricky, but well worth it! I did cut it twice, only because I didn't like the parts of the tree I saw through the circle opening. I used the circle cut from the front, as a template to see where I wanted to cut.  It works pretty well!
  • Once that is done to your satisfaction, we need to add a little color.
  • I used a Blending Brush and Pool Party ink, just around the outside edges of the "Grassy Grove" circle.  I also burnings Pool Party ink around the upper opening of the circle.
  • Now to put it all together.
  • Place Tear n Tape on outside 1/2" of one of the scored boxes, both ends. Attach both parts of the box together. Flat, it will go into an envelope, pushed up, and it's a Shadow Box!
  • Now, lay the "box" flat. Fit the "Grassy Grove" piece into the circle opening. Decide where the smaller "deer" goes in the "trees" and adhere to the background.  Then attach the circle. to the DSP.
  • Attach the larger "deer" to the front.
  • Finish with a sentiment stamped on the red DSP.
  • I also decided to add continuing strips of DSP to the adhered sides.
Product List

Thursday, December 14, 2023

Fluffy Friends Diagonal Cut Fold

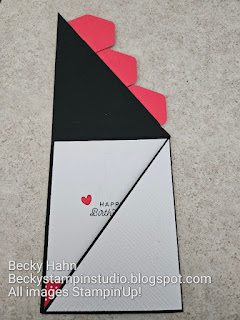
 I saw a version of this card and thought it would be PERFECT for my class I had last month in Springfield, as it showcased some new products!! They loved it, and I do, too!  We'll have to do it in my class, here!  It uses a piece of diagonal-cut piece of cardstock, some coordinating birthday-themed stamps from several sets, and highlights a new punch!


Measurements:  

  • Basic Black: full sheet cut in half DIAGONALLY
  • Basic White: 4" x 5 1/4" (cut diagonally into 2 pieces, you'll need only 1), scraps
  • Sweet Sorbet (N): 2 1/2" x 8 1/2" strip
  • Bee Mine Valentine DSP: 4" x 5 1/4" (small hearts), 1/2" x 4" strip
To Make This Card:

  • Cut full sheet of cardstock in half Diagonally.  (this design makes 2 cards).
  • You can fold by either folding points into place an creasing with a bone folder, or you can place into a paper trimmer or score board and score the lines at 4 1/4" and 5 1/2" and then creasing with bone folder.
  • Attach White quarter to inside of card, as well as the strip of DSP.
  • Run White diagonal piece through "cross hatch" embossing folder, from the Basics 3D embossing folder in the Online Exclusive Store. Be aware of which side of the piece you are embossing.  Attach to corresponding front.
  • Next, cut DSP at a diagonal as well. Double check which direction (diagonal) you need to cut this piece so it matches the cut on the card front.
  • Now, attach DSP to correct diagonal piece.  It will have a 1/16" -1/8" border.  Note: be aware of any directional patterns! (I try to avoid them).
  • Now, to decorate!
  • Stamp 3 "hexagon borders" in Memento black onto strip of Sweet Sorbet cardstock. Punch out with corresponding, (new) punch!
  • On one, stamp the sentiment from the Heartfelt Hexagon stamp set in Memento Black.
  • For the other two, I stamped the "bunny" from the Fluffiest Friends (Online Exclusive) and "cupcake" from the Circle Sayings in the Annual Catalog.
  • Color as shown with Blends.
  • The "bunny" can be die cut, the "cupcake" you will need to fussy cut.
  • I attached both to a punched image with Dimensionals.
  • Now,to attach to the card. I attached the first one to the top, so that the top point is even with the fold, and the outside edge even with the other fold.  I repeated for the bottom piece with the "cupcake".
  • The "words" should fit in between! (adjust if necessary)
  • Open the top flap and lightly make a pencil mark showing the diagonal. This will guide you for the inside sentiment placement.
  • Open up the other flap, and stamp sentiment in Memento Black. I also added 2 Sweet Sorbet hearts.
  • Erase the pencil mark with the ink is dry.
  • Finish with a little Wink of Stella on the images, and 3 Pearl Neutrals Sequins on the sentiment.
Product List

Wednesday, December 13, 2023

Winter Meadow Stack, Cut, Shuffle

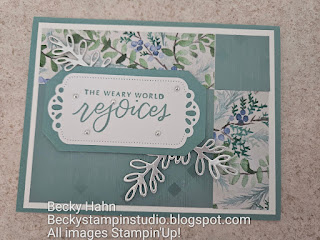
 I just LOVE the colors of this card!  It uses the gorgeous Winter Meadow DSP (carrying over) and the Lost Lagoon color of the Tartan Foil DSP in the Online Exclusive Store. It uses the Stack, Cut, Shuffle technique for making 4 cards from the stacks (however, I only made 2). We did this card in both of my classes at the Senior Center! I also love the layers of the labels!  Too pretty! And, the little touch of silver, makes this goregous IRL! The top card is the one we did.  The bottom is another orientation and message using some of the other pieces.


Measurements:  

  • 4 (2) Card bases - Lost Lagoon: 1/2 sheet, 2 1/4" x 3 1/4" (label)
  • 4 (2) Layers of Cardstock - White: 4" x 5 1/4", 1 3/4" x 3 1/2" (label)
  • 4 (2) Layers to Cut: 3 ¾” x 5” (1-Print DSP, 1 - Lost Lagoon Foil) This is what you’ll STACK, CUT, & SHUFFLE.
  • Silver Foil: scraps
To Make This Card:

  • Stack all the top layers together.·         
  • Make the first cut 1 ¼” from right side.  This makes 2 “piles”.
  • Turn the 2 piles 90° (horizontally) and make another cut at 1 ¼” from the right side. Take care to keep the pieces in order in each pile.·         
  • Lay stacks of pieces out the way that they will be finished on the card.·         
  • Start with the largest piece, and leave the stack as is.  Go to the stack to the left, and shuffle the top one to the bottom, go to the next stack and shuffle 2 to the bottom, go to the last stack and bring the bottom piece to the top.  You’ve now accomplished “the shuffle”!!·        
  • Start gluing the pieces to the card layers, as shown. This version, the pieces are touching each other, with a 1/8” outside border.·        
  • Continue until all 4 layers are created.·        
  • Next, continue with your “focal point”. Decide on your “theme” and use this for your “focal point”.
  • For this one, I cut a "hexagon" from the Countryside Corners Dies in Lost Lagoon.
  • I cut the White label from the Labels Aglow Dies. Stamp sentiment in Lost Lagoon, and then attach to Lost Lagoon piece.
  • Mount to card with Dimensionals. Either orientation will work!
  • Lastly, die cut 3 "sprigs" in Silver Foil from the Christmas Classics Dies. Tuck these under label, as shown.
  • Finish with a few scattered silver pearls from the Festive Pearls.
Product List

Tuesday, December 12, 2023

Clean & Simple Joy of Christmas

 I saw a version of this card online and thought it would be PERFECT for my Senior Center ladies! (and it was!) I love the layout, which could be used with so many of our gorgeous DSP's.  Did you notice our new Hexagon Punch?  You might have ordered it for World Cardmaking Day in October. But, it will be available, again, in our next Mini Catalog!  I just love it!

Measurements:  

  • Shaded Spruce: 1/2 sheet cut LENGTHWISE
  • Basic White: 4" x 5 1/4", 2 1/4" x 3 1/4" (punched label)
  • Real Red: 4" x 5 1/4"
  • Joy of Christmas (N)(ret): 1 3/8" x 3 3/4", 1/2" x 4" (inside strip)  (green check); 3 3/8" x 3 5/8" (holly print)
To Make This Card:

  • Add "green check" DSP to the bottom of the Red layer, leaving 1/8" border on 3 sides.
  • Next, take the "holly print" and cut into 3 - 1 1/8" pcs, so measure 1 1/8" x 3 5/8".
  • Lay out these 3 pieces above the "green check" to see if they have a pleasing fit. I started with the 2 outside pieces, and then added the inside piece.  They should fit directly agains the "green check".
  • Now, wrap the 5" strip of ribbon around the red layer, covering where the 2 papers join. Tape to the back.
  • Now, you can attach this to the folded Shaded Spruce card. 
  • Stamp the border from the new Heartfelt Hexagon stamp set in Shaded Spruce onto label piece. Stamp desired sentiment in Real Red.
  • Punch out with coordinating punch.
  • Add to card with Dimensionals
  • Finish with small, red bow. and Red jewels.

Product List