Wednesday, June 29, 2022

Clean & Simple Inlaid Card

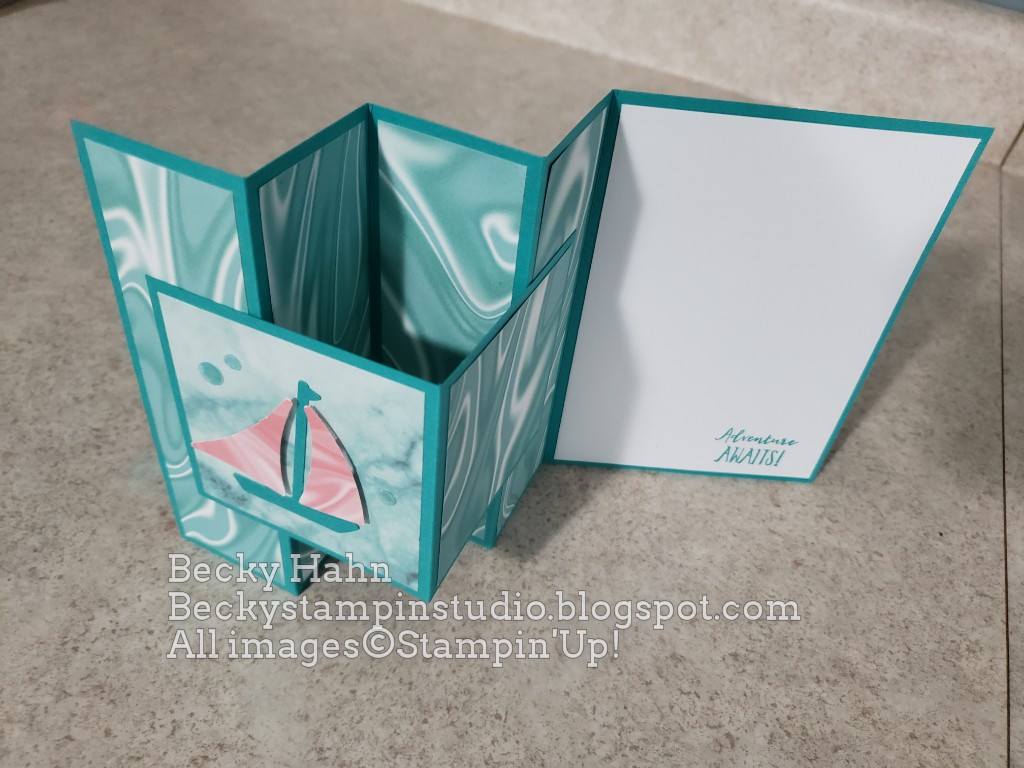
This card features the Inaid Technique using the Picture This dies. We designed this card for Garner.  Think of the possibilities using up your scraps!!  Love the use of the Biggest Wish stamp set, which I don't use often enought!


Measurements:  

  • Just Jade (ret): 1/2 sheet, 4" x 5 1/4"
  • Sweet Symmetry DSP (ret): scraps
  • Basic White: 4" x 5 1/4", scraps
To Make This Card:

  • Cut rectangle Picture This die from Just Jade layer.  Attach to folded Just Jade card. Note: for a variation, you could pop up the die cut layer or the inserts.  For my purposes that would be a little difficult for my Assisted Living stampers.
  • Cut one "outside" rectangle from White, and the remaining 2 rectangles from DSP of your choice.
  • Stamp sentiment in Just Jade ink onto White piece.
  • Inlay these pieces into matching openings.
  • Attach White layer to inside and stamp desired sentiment.
  • Finish with knot of ribbon, jewels, or whatever you would like to use!

Product List

Tuesday, June 28, 2022

Let's Set Sail Side Accordion Fold

I wanted to make another one of these Side Accordion Fold cards. This sample is a version I made from one I saw from Sharon Armstrong. It uses the retired SAB Simply Marbleous DSP and the current Let's Set Sail bundle. I just LOVE it!


Measurements:  

  • Bermuda Bay: 5 1/2" x 11", 3" x 6", scrap
  • Simply Marbelous DSP: 4 pcs @ 1 3/4" x 5 1/4", 2 pcs @ 2 3/4" square (Bermuda Bay), scrap (pink) 
  • Basic White: 4" x 5 1/4"
To Make This Card:

  • Score the base at 1 3/4" - 3 1/2" - 5 1/4" - 7".  Accordion fold, crease well with Bone Folder.
  • Score the 3" x 6" piece at 3". 
  • Attach DSP strips to corresponding "accordion folds".
  • Add 2 3/4" square of DSP to the 3" x 3" card. You'll add the other later, once it's done, so you can decide which side you want to use of the DSP.
  • Attach this smaller card to the accordion folds, attaching the front, to the front fold, and the back to the back, or 4th accordion.
  • Attach the White piece to the inside.
  • To create the front.  Punch the "mast" from Bermuda Bay cardstock, and the "sails" from the Pink Marble DSP.  Attach the "mast" flat, and pop up the "sails" with Dimensionals.
  • Finish with scattered blue Artistry Sequins.
Product List

Saturday, June 25, 2022

Calypso Coral Love It, Chop It

Here is another card we designed for Garner on Monday. It also uses retired products. This one has a fun layout, and uses some retired DSP, and one of my favorite dies - Stitched Shapes! Again, so many possibilities!!

Measurements:  

  • Calypso Coral: 1/2 sheet, 2 1/4" x 4 1/8", 2 1/4" x 4 7/8"
  • Waves of the Ocean DSP (ret): 2" x 3 7/8", 2" x 4 5/8" scrap
  • Basic White: 2 pcs @ 4" x 5 1/4", scraps
To Make This Card:

  • Attach one White layer to OUTSIDE folded Calypso Coral card and the other White layer to the INSIDE.
  • Attach DSP to coordinating pieces.  Attach largest piece to front, and "pop up" the smaller piece, as shown, with Dimensionals.
  • Stamp sentiment in Calypso Coral onto scrap of White.  Cut out with one Stitched Oval.  Attach to larger Stitched Oval cut from Calypso Coral.  Mount onto card, as shown.
  • Finish with a knot of retired Ombre Calypso Coral ribbon and retired Artistry Pearls.
Product List

Friday, June 24, 2022

Gingham Strawberry

 Mom & I got together yesterday to create our cards for my Garner classes on Monday. We frequently create using retired products, so I can use up what I have and use some of my favorite stamps!  But the beauty of that is that the designs and layouts are still doable with ANY products you have in your stash!! This one uses the Black Gingham from the retired Host paper pack and a Poppy Parade strawberry.  The inspiration came from the Accordion Fold layout we did in class this week.  See previous post.


Measurements:  

  • Basic Black: 1/2 sheet, 3" square
  • Pattern Party DSP (ret): 1 7/8" x 5 1/4", 2 3/4" square
  • Basic White: 4" x 5 1/4", scraps
To Make This Card:

  • Trim 2 1/8" from front of folded Black card.
  • Attach longer strip of DSP to front of card, and smaller square to Black square.
  • Attach White layer to "inside" of card.
  • Stamp sentiment in Black, onto scrap of White.  Cut out with Stitched Rectangle.
  • Stamp solid "strawberry" in stamped off Poppy Parade onto scrap of White, stamped "detail" full strength and punch out with corresponding punch. Repeat with "stem" and Garden Green.  Assemble
  • Add sentiment to square, and pop up strawberry with Dimensional.
  • Finish with Black Matte Dots.

Product List

Thursday, June 23, 2022

Awash in Beauty Side Accordion Panel Card

 I've been wanting to try this fold for some time, and gave it a try today!  It is really neat, and so easy to do!! It's called a Side Accordion Panel Card. I used the new Awash in Beauty DSP for the layers, and used a stamped flower from the Happiness Abounds stamp set.


Measurements:  

  • Balmy Blue: 5 1/2" x 11", 3" x 6"
  • Awash in Beauty DSP (N): 5 1/4" x 12" piece (will cut into pcs later), 2 3/4" square
  • Basic White: 2 7/8" square, scrap
  • Blushing Bride: 2 3/4" square
  • Pear Pizzazz: scraps
To Make This Card:

  • Score the base at 1 3/4" - 3 1/2" - 5 1/4" - 7".  Accordion fold, crease well with Bone Folder.
  • Score they 3" x 6" piece at 3".
  • For this version, cut the DSP strip into 1 - 3 3/4" piece, and 4 pcs @ 1 1/2". You will have a little bit remaining.
  • Attach these pieces to the corresponding areas.
  • Add 2 3/4" square of DSP to the 3" x 3" card.
  • Attach this smaller card to the accordion folds, attaching the front, to the front fold, and the back to the back, or 4th accordion.
  • Then, attach the White piece behind this smaller card for sentiment.
Product List