Showing posts with label Let's Set Sail. Show all posts

Tuesday, June 28, 2022

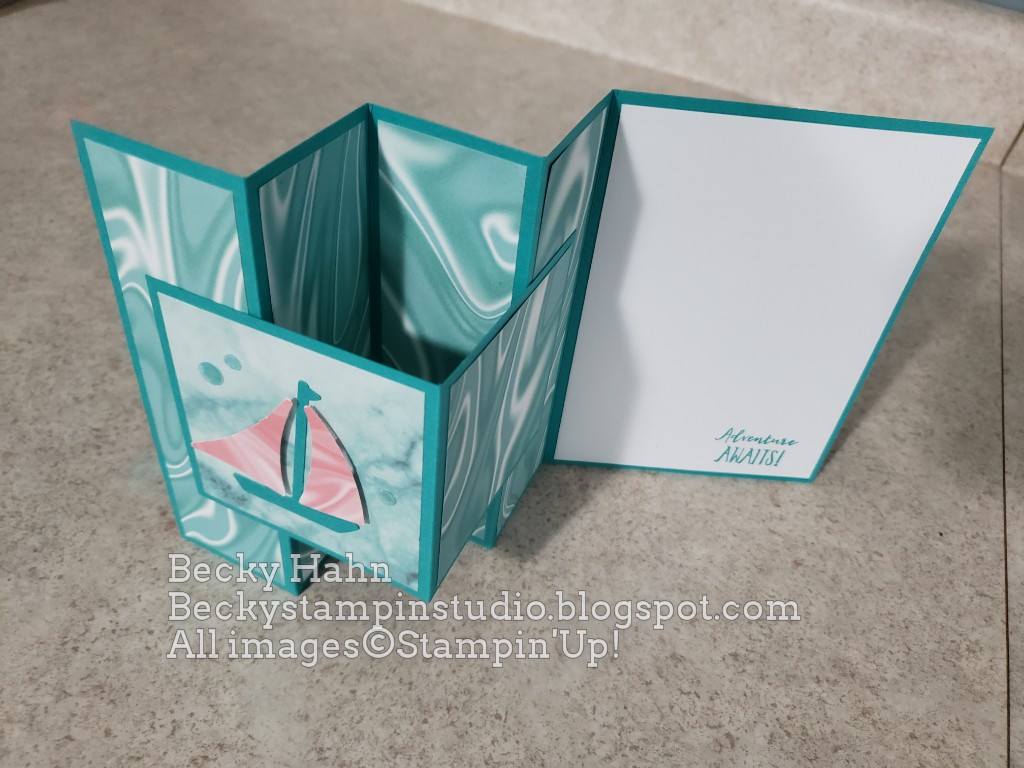
Let's Set Sail Side Accordion Fold

I wanted to make another one of these Side Accordion Fold cards. This sample is a version I made from one I saw from Sharon Armstrong. It uses the retired SAB Simply Marbleous DSP and the current Let's Set Sail bundle. I just LOVE it!


Measurements:  

  • Bermuda Bay: 5 1/2" x 11", 3" x 6", scrap
  • Simply Marbelous DSP: 4 pcs @ 1 3/4" x 5 1/4", 2 pcs @ 2 3/4" square (Bermuda Bay), scrap (pink) 
  • Basic White: 4" x 5 1/4"
To Make This Card:

  • Score the base at 1 3/4" - 3 1/2" - 5 1/4" - 7".  Accordion fold, crease well with Bone Folder.
  • Score the 3" x 6" piece at 3". 
  • Attach DSP strips to corresponding "accordion folds".
  • Add 2 3/4" square of DSP to the 3" x 3" card. You'll add the other later, once it's done, so you can decide which side you want to use of the DSP.
  • Attach this smaller card to the accordion folds, attaching the front, to the front fold, and the back to the back, or 4th accordion.
  • Attach the White piece to the inside.
  • To create the front.  Punch the "mast" from Bermuda Bay cardstock, and the "sails" from the Pink Marble DSP.  Attach the "mast" flat, and pop up the "sails" with Dimensionals.
  • Finish with scattered blue Artistry Sequins.
Product List

Tuesday, April 26, 2022

Clean & Simple Let's Set Sail Card

This is the card what was the inspiration for my Let's Set Sail Center Pop Up Card! It uses the new Gentle Waves background stamp with the Let's Set Sail Bundle!


Measurements:  

  • Basic White: 1/2 sheet, 3 3/4" x 5", 2 3/4" x 3 3/4"
  • Coastal Cabana: 4" x 5 1/4", 3" x 4"
To Make This Card:
  • Attach Coastal Cabana piece to folded White card.
  • Next, stamp the Gentle Waves stamp in Coastal Cabana on the 3 3/4" x 5" piece.  I placed it on my Stamparatus, so that if it didn't completely ink up, I could re-stamp it!
  • Stamp the "water" in Coastal Cabana onto the smallest piece of White, near the bottom. Stamp the "reflection" of the boat in Shaded Spruce onto the "water".
  • Now, stamp the "boat/mast" on top of the "water", matchin up the "reflection". Stamp the "sails" in Crushed Curry, as shown.
  • Stamp "seagulls" in Basic Gray and sentiment in Shaded Spruce.
  • Blend in a little Crushed Curry for the "sun", and a little Coastal Cabana for a light "sky".
  • Attach the White piece to the smaller Coastal Cabana piece.  Then, add to card front with Dimensionals.
  • Finish with Wink of Stella on the "water". 

Product List

Monday, April 25, 2022

Full Center Pop Up Card Option

I saw this layout/color combination and loved it!  So, needless to say, I had to try it!  But, before I did the Clean & Simple version, I wanted to figure out how to make it into a Center Pop Up Card!!  My version utilizes the Gentle Waves background stamp in Coastal Cabana and the Let's Set Sail bundle in Crushed Curry & Shaded Spruce, in my new, favorite Fun Fold! I also added the pop up section to an actual card!  Check it out!


Measurements:  

  • Coastal Cabana: 1/2 sheet (card base), 4 1/4" x 9 1/2" (Center Mechanism)
  • Basic White: 2 pcs @ 4" x 5 1/4", 3 3/4" x 4" (top of Pop Up), 2 3/4" x 4" (under window sheet), 
  • Window Sheet: 2 1/4" x 3 5/8"
To Make This Card:
  • This card created a little differently than my "original", in that the center piece showing under the window, is a separate piece, rather than a layer on the "base".
  • Begin by stamping the Gentle Waves stamp in Coastal Cabana on several of the Basic White pieces!  I placed it on my Stamparatus, so that if it didn't completely ink up, I could re-stamp it!
  • Stamp the "full" stamp on 4" x 5 1/4" piece and the 3" x 4 3/4".  Then stamp only the bottom 1/3 of the smallest white, 2 3/4" x 4" piece (for under the window).
  • Now, take the 4" x 5 1/4" stamped piece, and remove 1 1/4" from it, twice.  Adhere one piece, with 1/8" border to the folded Coastal Cabana card on the left side, and the other on the right side.
  • Next, take the 2 3/4" x 4" with the "partial" waves.  Stamp some clusters of "seagulls" in Basic Gray above the waves. Add a little "sunshine" to the stark White background with Crushed Curry and a Blending Brush.  (I had enough yellow ink on my Brush to just use what was on it to add some color!)  Adhere this piece between the 2 - 1 1/4" pieces already on the folded Coastal Cabana card. Set aside.
  • Score the Center Mechanism along the 9 1/2" side at: 1/2", 1 1/4", 2", 2 3/4", 6 3/4", 7 1/2", 8 1/4" and 9". Lightly crease the ends, creating "columns".
  • Take the largest Stitched Rectangle Die that will fit on the top pop up, stamped "wave" piece and cut  out the opening. Discard the center.
  • Adhere this piece with the cut opening onto the center 4" section of the Center Mechanism piece.
  • Now, cut a smaller opening with the next, smaller size Stitched Rectangle Die. This creates a nice "frame".
  • Place 1/8" Tear n Tape around the opening on the wrong side.  Attach Window Sheet.
  • Place 1/4" Tear n Tape on each end of the "mechanism" (1/2" piece).
  • Skip one scored section on the "mechanism" and then place 2 rows of 1/4" Tear n Tape on the next section.
  • Remove backing on 1/2" section.and fold into place (see video).
  • Next, remove backing on next section.  Take "base" with "waves" on it.  Flatten the Center section one direction (right or left). Match folded edge to cut edge of "base" and adhere.  
  • Now, flatten the other direction, match the folded edge to cut edge of other side of "base" and adhere.  
  • Voila! You have a Pop Up Center!!
  • Now you need to finish decorating the front!!  
  • I stamped the "sails" in Crushed Curry and the "boat" in Shaded Spruce, and punched out with coordinating punch!
  • I put it together with Mini Glue dots and adhered to Window Sheet.
  • To finish, put the other trimmed 1/4 sheet inside, and add whatever embellishments or sentiment that you feel is necessary!

Product List

Friday, April 15, 2022

Clean & Simple Rainbow Sailboat

OMG!  This card is Gorgeous IRL!! The blended colors are just stunning, and then add the detail of the Gentle Waves stamp, punched Sail Boat, little seagulls, and vellum clouds.  Just awesome!

Measurements:   

  • Basic White:: 1/2 sheet, 4" x 5 1/4"
To Make This Card:

  • Begin by creating your blended background on the smaller White piece.
  • First, stamp the Gentle Waves in Bermuda Bay ink. I stamped approx the lower third of the piece of cardstock.  With my larger stamps, I like to use my Stamparatus
  • Beginning at the "top", blend in So Saffron ink with a Blending Brush. Next, add Mango Melody, overlapping in to the Saffron just a little bit.  Then, add Flirty Flamingo down to the stamped "waves". Also, overlapping just a little bit. Finish with Bermuda Bay ink, again overlapping a little into the Flamingo (which creates a neat light purple effect!) And, voila, you are done! Oh, and brush a little Wink of Stella for some sparkling "waves"!!
  • Next, take a Stitched Rectangle die, and cut out the center.  Attach the outside "frame", flat to the folded White card.
  • Now, we'll finish the design of the card.  Punch out the "base/mast" in Basic Black.
  • Stamp the "sails" in stamped off Basic Gray.  Punch out. Assemble these, where desired, onto "waves". I popped up the sails with Dimensionals.
  • Next, add a couple vellum, die cut, clouds and some Basic Gray "seagulls".
  • Finish the card by adding the design piece to the "frame" with adhesive strips - "Eclipse-style". (remember that technique!)

Product List