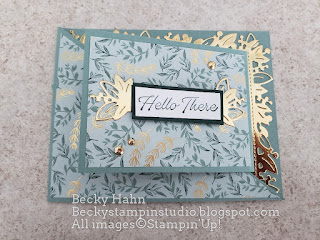
This is my final sampler using this awesome fold....for now. This version is my version of a sample that I saw using this fold. Again, I turned to one of our gorgeous DSP papers. Unfortunately, this DSP is retired, but I know many of you already have it! Instead of the Stitched Greenery for the background, I utilized the gorgeous border dies, that a still available! I was very pleased with how this turned out!
Measurements:
- Soft Succulent: 1/2 sheet, cut LENGTHWISE, 3" x 8"
- Basic White: 2 3/4" x 3 3/4", scrap
- Ever Eden DSP (ret): 4" x 5 1/4", 2 3/4" x 3 3/4"
- Brass Foil (ret): 1 1/2" strip
- Evening Evergreen: scrap
To Make This Card:
- Fold Soft Succulent base in half. Cut diagonally from upper right corner, to lower left point. Discard the lose piece.
- Now, take DSP and also cut diagonally, as shown. Attach one piece to the card front.
- Fold the 3" x 8" piece in half.
- Stamp the White piece with selected images. And adhere to the inside of this "2nd card".
- Add the DSP piece to the front of this "mini card".
- Cut "label" and 2 "borders" from Gold/Brass Foil.
- Attach the "label" to the front of the "mini card". It was too long, so I cut it in half, removed about 3/8" and adhered it to fit.
- Then, I stamped a sentiment from the set in Evening Evergreen, and mounted it onto a scrap of Evening Evergreen cardstock, and attached it over the "label" with Dimensionals.
- Trim 2 border pieces so the stitching just shows. Attach one to the top, and one to the right side. I mitered the corner after the "mini card" is attached, so leave the borders overlapped at the corner.
- Next, take this "mini card" and securely attach to inside of base.
- To close the card, Fold in the diagonal flap and then the "mini card" front.
- Now, to miter the corner, take a ruler an draw a line from the point of the "mini card" to the point of the main card. Get in there with your paper snips and cut diagonally. They don't need to meet, just be cut at an angle.
- Finish Gilded Gems


No comments:
Post a Comment