Showing posts with label penguin playmates DSP. Show all posts

Sunday, December 19, 2021

Penguin Pal On Point

I'm still on a roll with these fun "On Point" cards!  This one uses our darling Penguin, that is carrying over, and the retired Penguin Playmates DSP, that I know many of you have, but you can really use anything! I also tucked in one of our Wonderful Snowflakes!  The sentiment is from a soon-to-be-released SAB stamp set - Special Moments.
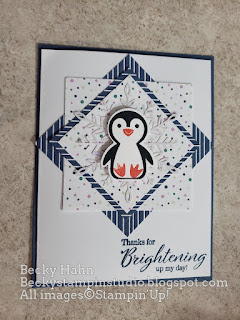

Measurements:  

  • Misty Moonlight: 1/2 sheet
  • Penguin Playmates DSP: 2 1/2" square, 3" square (dk print), 2 1/4" square & 3" square (lt print)
  • Basic White: 5 1/4" x 8 1/8", scrap
To Make This Card:

  • Fold White card base in half.  Stamp sentiment in lower right hand corner.  Now, attach to Misty Moonlight base.
  • Stamp desired "penguin" onto scrap of White.  Stamp "beak" & "feet" in Calypso Coral and then, punch out with coordinating punch.
  • Layer small, light square to smallest "dark" layer (this is a change from my "original" one) Next, layer this to the "light" 3" square, "on point".  Finish by adding last, dark square also "on point" - this will match the smallest square. 
  • Attach this to the card front.
  • Add "snowflake" to card with Mini Glue Dot.
  • Finish by attaching "penguin" to card with Dimensionals. 
Product List

Saturday, December 18, 2021

Penguin Place Pull Out/Pop Up Card

Here is another one of these awesome Pull Out/Pop Up cards using the delightful Penguin Place Bundle and retired Penguin Playmates DSP. This version would make a great birthday card! 


Measurements:  

  • Fresh Freesia: 5 1/4" x 9 3/4" (base), 3 3/4" x 7 1/2" (inside), 2 1/2" square (mechanism), 3" x 4" (tag layer)
  • Penguin Playmates DSP: Print #1 - 4" x 4" (top), 1 1/4" x 4" (bottom, outside): Print #2 - 2 3/4" x 3 1/2" (top, inside), 3 1/2" x 4 1/4" (bottom, inside); 
  • Basic White: 2 1/4" x 3 1/4" (inside sentiment), 2 1/2" x 3 1/2" (tag layer)
To Make This Card:
  • For the base, score at 4 1/4", then turn and score at 1/2" on each long end.
  • Next, you will need to remove the cardstock from the longer side of each 1/2" side starting at the bottom, and cutting up to the score line, then cut along the score line.  Discard this piece.  For ease in attaching later, cut a small "wedge" away from the fold to the outside edge.  This eliminates bulk up at that corner.  I do this frequently to eliminate bulk! Crease remaining score lines well.
  • Fold down into place, and attach 4" square of DSP to the "front".
  • Next, let's work on the "insert".  Score this piece at 3". Crease well with bone folder.
  • Attach smaller piece of DSP to the "top", and larger inside piece of DSP to the inside. You'll also add the White inside.  To do this, line up the shorter, cut edge about 1/4" from the crease.  Any lower, and you might see it. If you know what you want to stamp, you might stamp this now, while it's flat!
  • Now, we'll work on the "mechanism".  Score the 2 1/2" square at 3/8" on 2 opposite sides.  Crease well. 
  • You will want to "break the fibers" in this piece to it moves easier.  To do this, take your bone folder and curl the cardstock in the direction of your score lines. Do this several times, or until it starts to curl (like your curling ribbon would!)
  • Place Tear & Tape on each 3/8" section. Remove ONE cover.
  • Next, take the insert piece and fold it into position.  Flip over the "mechanism" and place the cut edge with the adhesive even with the top crease of the inside piece, centering it.  Press into place. Flip this piece up, so you now see the other 3/8" edge with the score tape.
  • Now, grab the "base/outside" piece. Open up the flap.  Slip the "insert" inside with the mechanism "up".  Remove the Tear & Tape cover. Close the top flap so that the bottom cut edge of the FLAP is even with the crease of the mechanism.  Close securely.  The other 3/8" will now be adhered to the base flap, around the center.
  • To create the "pocket", flip open the "base".  Flip up the insert. Wrap the 1/2" pieces around the insert, creating a pocket.  Place Tear & Tape on the 1/2" extensions, remove covers and close the bottom up and into place. Now, give it a try!!  
  • Oh, it sticks a bit doesn't it.  It's catching on the edges of the "pocket". So, we will take the remaining piece of DSP and attach it to the bottom and over the edges.  To do this, pull the insert out all they way.  Put adhesive on the strip.  Attach to the bottom of the base, leaving an 1/8" around the bottom edges, and just catching the "pocket" edges.  Shove it into place.  Now, give it a pull.  It should would smoothly!!
  • I decided that it might be a little difficult for the recipient to know what to "do" with this card!  So, I decided to add a little "pull" to this one!  Punch a place to thread a small piece of ribbon.  A hand punch, or the slit in our Detailed Trio Punch or Label Me Fancy Punch would work, too!
  • For this version, I layered 2 dies from the Hippo & Friends bundle. (Love the layered dies in this one!) And then added a Wonderful Snowflake and a stamped, punched and decorated "penguin".
  • Don't forget the piece inside...I did!!
Product List

Sunday, October 31, 2021

Penguin Flip Flap Card

Here is another Flip Flap Fold original!  I used a previous card (actually an Explosion Card) and made it into a different fold!!  Why reinvent the wheel, right! I LOVE placing my little penguin on a "Wobble" for a little "action"!


Measurements:  

  • Fresh Freesia: FULL sheet
  • Basic White: 2 3/4" x 4", scraps
  • Penguin Playmates SAB (ret): 3 pcs @ 4" x 5 1/4".  2 - "snowflakes", 1 Fresh Freesia print

To Make This Card 
  • Take full sheet of cardstock and fold in half, crease well. Open up and fold in half the other way, crease well. (Or, score at 4 1/4" and turn and then 5 1/2".) Use Paper Trimmer and trim away lower left quarter.
  • Now refold, as shown. (This version has a different orientation!  But it works!)
  • Attach Freesia print DSP to front around outside edges. Cut Scallop Contour Rectangle from the front. (Watch the orientation!!) Remove DSP center and keep this to use later.
  • Cut this same Scallop Contour Rectangle from piece of Basic White.  Then, run it throught the "Snowflake" Wintry 3D mini Embossing Folder.
  • Open up front flap.  Attach one "snowflake" DSP piece. Close front and insert Embossed White piece through the opening, attaching to opposite side.
  • Stamp penguin as shown.  Punch out with coordination punch!
  • You will need to stamp and "fussy cut" the "hat" and "scarf".
  • I added this little guy to the White label with a "Wobble". (which you can get on Amazon and some stamp stores).
  • Now, open the card up all the way. Place the last "snowflake" piece on the left, and the removed print scalloped rectangle through the opening.
  • I added a trimmed message on top of the label, and pearlized snowflakes on the other side.
  • Finish with a Fresh Freesia Open Weave Ribbon bow.
  • Note: I didn't leave anywhere to add a message.  So, I would probably remove one snowflake and add a small piece of white or Fresh Freesia to the left side to write on!
Product List

Friday, September 17, 2021

Penguin Explosion (New Version) Card + Video

Julie Davison shared this awesome Explosion Card using the Sweet As a Peach bundle. I saw it's a "new version", because it's not the OLD version, that I used to doI decided to update it using the darling Penguins from the Penguin Playmates SAB DSP, that will be ending soon! And, instead of holding it closed with a "belly band", I preferred to use the new Scallop Contour Dies and a small velcro dot! We will be making this card at my Fun Fold Card Class next week!


Measurements:  

  • Fresh Freesia: 1/2 sheet, scrap
  • Basic White: 2 3/4" x 4", 2 5/8" square, scrap
  • Penguin Playmates SAB (N): 2 pcs @ 1 7/8" x 5 1/4", 4" x 8" (explosion piece), penguin to "fussy cut".
To Make This Card 
  • Take the Fresh Freesia base and create a "gate fold".  I like to do this by scoring one end as 2 1/8" and then matching the opposide side to the cut edge and creasing.  This insures no "gaps".
  • Attach the DSP strips to the front flaps.
  • Cut scallop rectangle from White cardstock. Run this piece through the "Snowflakes" in the Wintry 3D mini embossing folders. Set aside.
  • Now, to fold the explosion piece from DSP.  Score DSP strip at 2", 4", 6", and diagonally from every corner to opposite 4" score as shown above. 
  • To crease it, watch the video!  It's an "origami" fold.  The side that you will see is folded to the INSIDE.
  • Place adhesive on the base and outside "triangles". .
  • Center this inside the card, lining up the cut edges to the outside edges. Then, fold it closed adhering back side to the inside. Note: the corners will NOT match the fold.  This aids in popping it up!
  • Now to finish the card! Attach HALF of the White embossed piece to the left flap of the card. Fussy cut a "penguin" from the DSP and attach to the front of this piece with Dimensionals.
  • Decorate the inside of your explosion piece!  I added a square of Basic White cardstock.  Stamp a "penguin" onto a scrap of White. Add Calypso Coral "feet" and "beak".  Stamp "stocking hat" and "scarf" in Fresh Freesia. You will need to "fussy cut" these 2 pieces.
  • Add these pieces to the inside square.  Stamp sentiment in black.  I also added the cute balloon from the Sheep Dies in Fresh Freesia cardstock.
  • Finish the card with a Fresh Freesia bow, and a small velcro dot.
Product List