Friday, June 14, 2024

Lift Flap Unbounded Beauty

 My hostess for club this month requested we play with this gorgeous mega suite, Unbounded Beauty! And, a beauty it is!  So many beautiful items to play and mix and match with!! Demonstrator Kelli Acheson shared some creative fun fold cards using this suite of products.  I've chosen this one to share with you today.  We will be making this at my Stamp Club tomorrow!


Measurements:  

  • Berry Burst 1/4 sheet, 2 7/8" x 4 1/4", scrap
  • Basic White: 4" x 5 1/:4", scrap
  • InColor Glimmer Paper (N): scrap of Pretty in Pink
  • Summer Splash (N): scrap
  • Unbounded Beauty DSP (N): 2 5/8" x 3 1/2" 
To Make This Card:

  • Score Berry Burst strip 1/2" from one end.  Crease well.  Attach DSP piece to front.
  • Stamp larger, outline flower in Berry Burst in lower right corner of White piece, as shown.  Stamp off Pretty in Pink and stamp over.
  • Next, attach "flap" to this White piece as shown.  I used Tear n Tape to adhere it securely to the White piece.
  • Then, attach this to the Berry Burst Post Card Base.
  • To create the focal point. Stamp sentiment on scrap of White in Berry Burst. Cut out with scalloped rectangle. (Yes, it makes 2 layers! Keep the scalloped piece for another project. Also cut a scalloped rectangle from a scrap of new, Pretty in Pink Glimmer paper. Toss the center, we will use the scalloped "frame". Assemble the 2 together, with Tape.
  • Next, cut a stitched rectangle from Berry Burst scrap.  This also cuts 2 pieces you pick the solid one!  Layer the other piece on top with a Dimensional. Set aside.
  • Now, die cut the single leaf from a scrap of the new Summer Splash color!  Also, cut a strip of Summer Splash ribbon.
  • Take the ribbon, fold in half and adhere behind Berry Burst "label".  Tuck the leaf under the glimmer frame. Then, add all to front flap with Dimensionals, making sure to just attach to the left side ONLY!
  • Finish with a stamped sentiment inside, and scattered new, Summer Splash Resin Dots.

Product List

Tuesday, June 11, 2024

Mediterranean Lemons

I'm back, again, from an awesome family trip to Alaska! And, wanting to play with my new toys!

The first bundle on my list from the new catalog was this suite of products called Mediterranean Blooms! I love rich colors of the fruit, combined with Navy of this card! Sadly, the dies did not cut out this image from the DSP, but there are, actually, some that do! This "frame" is just gorgeous, and has many options for cutting it out! (Like 3!!)  I created this card for my Senior Center ladies, and will definitely use it, again!


Measurements:  

  • Night of Navy: 1/2 sheet cut LENGTHWISE
  • Basic White: 4" x 5 1/4" (inside), 1/4 sheet (frame), scrap
  • Daffodil Delight: scrap
  • Mediterranean Blooms DSP (N): 4" x 5 1/4", 1/2" x 4" (navy print), fussy cut one lemon sprig
To Make This Card:

  • Adhere the Navy Print DSP to the folded Night of Navy card.
  • Attach white inside layer. Add strip of Navy DSP for a pop of color. You could also add a couple fussy cut blossoms from the DSP inside as well.
  • Now for the front. Take the "leafy frame" and the "outside" border dies, put them together and die cut the front frame from the 1/4 of Basic White.  Attach to card front with Green Glue.
  • Fussy cut a single lemon image from the DSP. (It really doesn't take that long. I cut the 4 for my class at the Senior Center for them!) Attach to card with Dimensionals. 
  • Stamp sentiment in Navy on scrap of White. Die cut with smallest tag die from the Wonderful Thoughts dies.
  • Die cut another "tag" from Daffodil Delight. Cut it 2 diagonally, and layer behind stamped tag. (Look at the picture above) Attach the card where desired.
  • Finish with new, yellow Opal Rounds in the flowers, and a couple blue Opal Rounds on the tag.
Product List

Arched Magnolia

 Here is another gorgeous card using the new, Online Exclusive, Magnolia Mood. I paired it with the dies also from the, Online Exclusive,  Garden Meadow Dies. This time I added a touch of color to the die cut with Blending Brushes and a little ink.  You should really give this one a try!  Don't forget to check out the awesome offerings in the Online Exclusive Store!! There are some wonderful items there!


Measurements:  

  • Petal Pink: 1/2 sheet
  • Very Vanilla: 3 7/8" x 5 1/8", 1/4 sheet 
  • Flowering Zinnias DSP (N) (OE): 3 1/2" x 4 3/4"  
To Make This Card:

  • Die cut "arch: from front, Very Vanilla layer. (I saved the insert for my sentiment.)
  • Next, emboss this piece with the "cross-hatch" Basics 3D Embossing Folder with the "arch" removed. Add to the folded Petal Pink card with Dimensionals.
  • Now, die cut the "arch", again, from the dotted DSP.  You will use the INSIDE of this piece. Adhere this, flush, with the card on the inside of the Vanilla "arch".
  • Now, die cut the large, detailed "magnolia" from the 1/4 sheet of Vanilla.
  • Add a little Petal Pink ink to the "flower", and a little Old Olive ink to the leaves with a Blending Brush.  I uses the larger size, but you won't have so much stray ink with the smaller one.  Lesson learned!!  Add a little Wink of Stella to the "flower".
  • Add Dimensionals behind the "flower" petals and attach to the card, as shown.
  • Cut a rectangle from the Vanilla insert.  Stamp sentiment in Basic Gray ink.  Attach to card as shown.
  • Finish with a Petal Pink Stripe bow, and scattered Champagne Rhinestones.

Product List

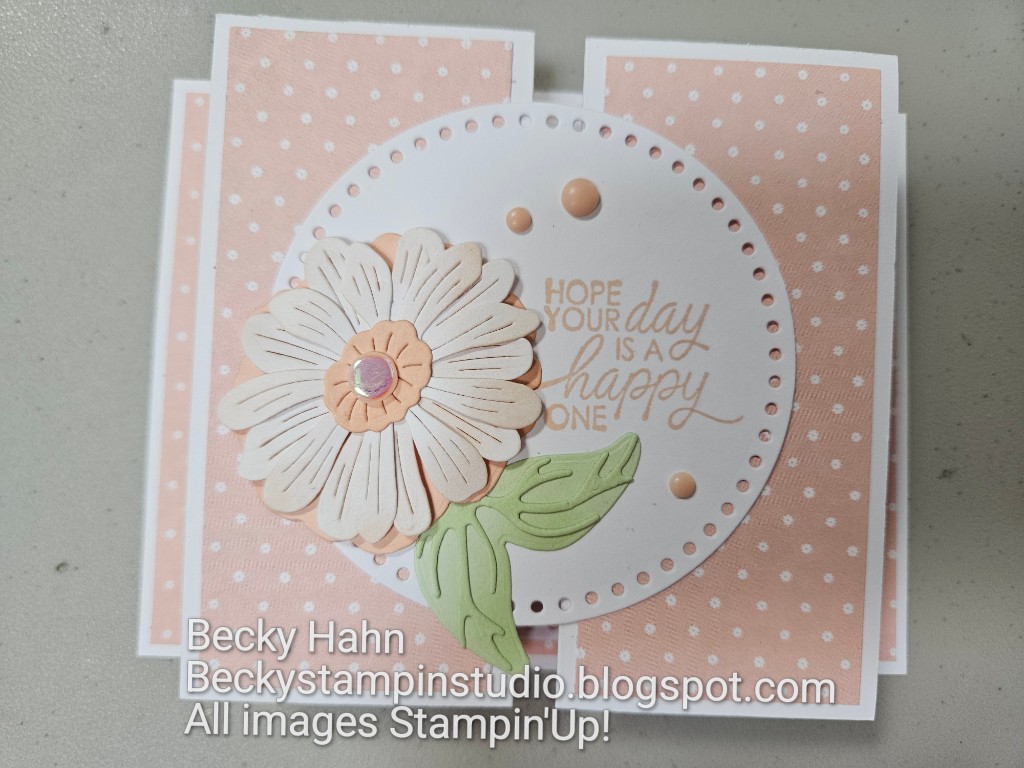
Simply Zinnia Mounted Double Gate Fold

I was wanting to make a sample for my Stamp Club that used the dies from the Online Exclusives Bundle, Simply Zinnia!  It's so refreshing to find a flower that I don't remember us ever having before! I found this sample that uses a Fun Fold that I haven't done in ages - the Mounted Double Gate Fold!! It's refreshing in that it doesn't utilize the bright colors of the gorgeous DSP, but the softer colors that coordinate with it! I just love it!


Measurements:    

  • Basic White: 4 1/4" x 11" (1/2 sheet cut LENGTHWISE), 1/4 piece (base), 3 3/4" square (circle), 2 5/8" x 4" (rectangle), scraps (flower)
  • Flowering Zinnias DSP (N) (OE): 2 pcs @ 7/8" x 4" (base), 2 pcs @ 1 3/4" x 4" (front "gates"), 2 pcs @ 1 5/8" x 4" (inside pcs), 3 1/4" x 4" (inside)
  • Petal Pink: scraps
  • Soft Sea Foam: scrap
To Make this Card:

  • Score long sheet at 2" - 3 3/4" - 7 1/4" - 9". Crease well with Bone Folder creating a Double Gate Fold.
  • Mount 2 narrow DSP pieces on either side of 1/4 piece.
  • Place Tear Tape onto back of Double Gate Fold piece.  Attach to base between DSP pieces.
  • Adhere the slightly wider strips to the front "gate" flaps. Attach the slightly narrower strips to the "inside" area.  And, lastly, add the panel to the inside.
  • Next, die cut the largest circle from the Everyday Details Dies.  Also die cut the largest Rectangle. Set aside.
  • Now, die cut the 2 "leaf" pieces from Soft Sea Foam cardstock. Add a little shading to the "veins" with Soft Sea Foam ink and a Blending Brush. Adhere together with "green" glue.
  • And, die cut one-each of the "flower petals" from White, and the "base and flower center" from Petal Pink.
  • Burnish a little color on the bottom flower, with Petal Pink ink and a Blending Brush. You can also add a little to the top flower, but not much.  Adhere together. I also shaped the top flower just a little bit.
  • Add flower center to flower, then attach all to Petal Pink "flower base", with a Dimensional.
  • Stamp sentiment in Petal Pink ink onto die cut circle. Attach "flower" to circle, and then tuck "leaf" underneath as shown.
  • Attach die cut rectangle to inside of card, and half of circle centered on card front.
  • Finish with Flat Pearl in center of flower, and scattered Rainbow Dots.

Product List