Saturday, September 16, 2023

Trucking Along Window

 So, I've had a request for a "red truck" card! So, I combined 2 cards I had seen to create this "red truck" card that also uses the Something Fancy Dies and the Glorious Gingham DSP! I just love it! We'll be doing this in class next week! Enjoy!!


Measurements:  

  • Basic White: 1/2 sheet cut LENGTHWISE, scraps
  • Glorious Gingham (N): 4" x 5 1/4" (Blueberry Bushel), 1/2" x 4" strip (inside)
To Make This Card

  • Using "green glue", adhere DSP piece to folded White card front.
  • Die cut "window" from front of card using the largest die shown from the Something Fancy Dies. Toss the cut out piece.
  • Stamp "truck" outline through the window in Memento Black ink. Now is the time to add whatever you would like to your truck.. I also "grounded" the truck using the "ground" stamp and stamped off Pecan Pie.
  • Next, stamp another "truck" outline in Memento Black ink onto a scrap of White cardstock. Also, stamp the "truck" Real Red, the tires Memento Black, and sign on the door, if desired.
  • Punch out with Truck Builder Punch and adhere to card, through window with Dimensionals.
  • Now, stamp sentiment in Real Red onto scrap of White cardstock.  Die cut with label  from the new Wonderful Thoughts dies.
  • Attach to card front with Dimensionals.
  • On inside, stamp greeting in Real Red and add a strip of coordinating DSP.
  • Finish with scattered, retired Red Rhinestones.

Product List

Friday, September 15, 2023

Mystery Stamping - 2 Rectangles and a Focal Point #3

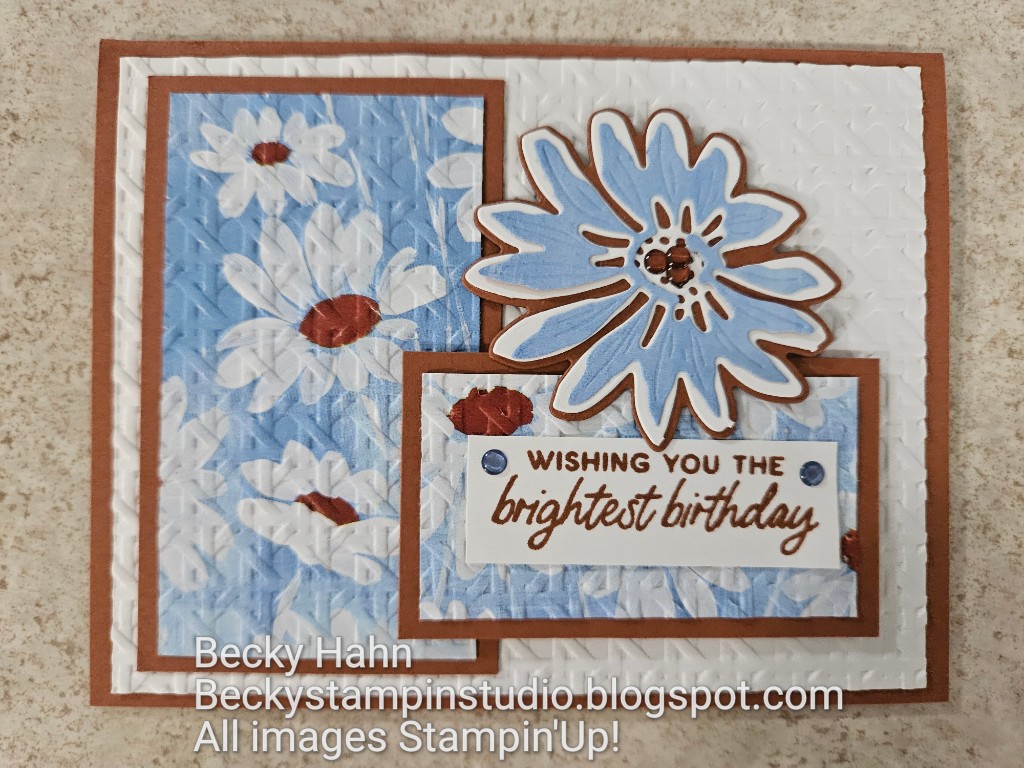
 I just love the possibilities of this layout!  So, I grabbed the Fresh as a Daisy DSP and coordinating dies and created this cardfor class next week! I love the Copper Clay and Boho Blue color combination along with the cheerful daisies! I hope they like it!


Measurements:  

  • Copper Clay (N): 1/2 sheet, 1 3/4" x 3", 2 1/4" x 3 3/4", 2 3/4" square (daisy base)
  • Basic White: 2 pcs @ 4" x 5 1/4", 3/4" x 2 1/4", 2 3/4" square (daisy)
  • Fresh as a Daisy (N): 1 1/2" x 2 3/4", 2" x 3 1/2", 1/2" x (5 1/4) or (4") strip, 2 1/2" square 
To Make This Card

  • Emboss one White layer and the 2 DSP pieces with desired Embossing Folder. I used the Cane Weave Embossing Folder.
  • Attach the White piece to folded Copper Clay card.
  • Attach each embossing DSP piece to its' corresponding layer. 
  • For this card my "focal point" is a die cut "daisy".  I decided to use the largest daisy and all 3 layers, but you can use whatever you'd like.
  • Assemble daisy.
  • Next, decide how you would like to arrange the 3 components on your card.  The choice is yours!
  • I decided on a landscape orientation, so I attached the larger rectangle to the left, and overlapped the smaller one on top, with Dimensionals.  
  • Then, I added the "daisy" also with Dimensionals.
  • I decided that I wanted a sentiment afterall, and stamped it in Copper Clay ink and added to the smaller rectangle.
  • Finish with InColor Dots.

Product List

Wednesday, September 13, 2023

Pick of the Patch meets Aspen Tree Die

 I spotted this card some time back, and thought I would use it for my "advanced" card class at Garner, as well as my monthly card class here!  It took me a while to find it again, but here is my version.  It uses the returning Aspen Tree Dies with the new Pick of the Patch Bundle, and the gorgeous All About Autumn DSP. They loved it!!  And, so do I!


Measurements:  

  • Early Espresso: 1/2 sheet
  • Very Vanilla: 4" x 5 1/4"  (inside), scraps (for pumpkins & label)
  • Thick Very Vanilla: 4" x 5 1/4" (outside die cut)
  • All About Autumn DSP (N): 4 x 5 1/4" any leafy background, 1/2" x 4" (inside)
To Make This Card:

  • Die cut Oval Aspen Tree Die from THICK Very Vanilla piece. 
  • Next, randomly stamp the small leaves in stamped off Old Olive onto "tree trunks".
  • NOW, attach the DSP to the die cut piece, then attach to folded Early Espresso card base.
  • Stamp and punch 2 large "pumpkins" and 1 small "pumpkin" in Pumpkin Pie ink.
  • Stamp and punch 4 "leaves" in Old Olive, and 3 "stems" in Early Espresso.
  • Attach "stems" and "leaves" to the WRONG side of the "pumpkins" with glue dots.
  • Adhere the left, large pumpkin flat onto card.  Adhere the other large pumpkin and the smaller pumpkin to the card with Dimensionals.
  • Stamp sentiment onto scrap of Vanilla in Early Espresso ink.  Die cut with label die from the returning Labels Aglow dies.
  • Finish with Neutrals Sequins.

Product List

Tuesday, September 12, 2023

Autumn Leaves Fractured Card

Playing with the awesome All About Autumn DSP tonight!  Beautiful paper, no wonder it's already on back order.  I need to get more when it comes back in! I used the pumpkins for my background and strips of some of the gorgeous foiled paper for the strips and one of the leaves. I love these fractured cards!


Measurements:  

  • Mossy Meadow: 1/2 sheet cut LENGTHWISE
  • All About Autumn DSP (N): 4" x 5 1/4" & 1/2" x 4"  (Pumpkins); 4 strips @ 1/4" x 4", scrap (Mossy Meadow print foil)
  • Vanilla: 2" square, 4" x 5 1/4" (inside)
  • Gold Foil: scrap
  • Copper Foil: scrap
To Make This Card:

  • Center Vanilla square (or whatever focal point you are using) to the DSP. DO NOT ADHERE TO FRONT OF CARD, YET.
  • Next, take one 1/4" Mossy Meadow foil strip and lay from corner of square, along the cut edge of the square, and off the DSP layer. 
  • Then, lay the next strip, butting the end to the previously laid strip, and laying this one also along cut edge and off the DSP.  Repeat until all 4 layers are done.
  • Next, trim off the strips so that they are even with the DSP.
  • NOW, adhere the DSP layer to the folded Mossy Meadow card.
  • Decide what your focal point is going to be.  I used a 3 leaves from the Autumn Leaves Dies with a little bow.
  • Lastly, adhere the Vanilla piece inside. I like to add a strip of coordinating DSP to the inside.
Product List

Monday, September 11, 2023

Oxidized Copper Leaves

 I love autumn leaves, and when I saw this new bundle, I knew that I had to have it! When paired with the new Oxidized Copper Specialty Paper it is just stunning!


Measurements:  

  • Copper Clay (N): 1/2 sheet, scrap
  • Copper Foil: 2 3/4" x 3 1/4", 1 3/4" x 3" (veins)
  • All About Autumn DSP (N): 2 pcs @ 1 1/4" x 5 1/4" (Peacock Foil Print) 1 1/2" x 5 1/4" (Copper Clay Foil Print), 1/2" x 4" strip
  • Oxidized Copper Specialty Paper (N): 2 3/4" x 3 1/4" (lg leaf), 1 3/4" x 2 3/4" (sm leaf)
  • Very Vanilla: 4" x 5 1/4" (inside)
To Make This Card:

  • Attach one Peacock Foil piece to left side of folded Copper Clay card. Then, add the Copper Clay Foil piece, and then lastly the other Peacock Foil piece. Set aside.
  • Die cut one each of the basic leaf shapes from the Oxidized Copper Specialty Paper.
  • Die cut one each of the leaf "veins".
  • Attach "veins" to the "leaves".  I used "green glue", but you could also try adhesive sheets! Set aside.
  • Stamp sentiment of your choice, in Memento Black onto scrap of Copper Clay. 
  • Cut out with label die.
  • Arrange leaves and label onto card. Attach leaves flat, and pop up label with Dimensionals.
Product List