Showing posts with label fresh as a daisy dsp. Show all posts

Friday, September 22, 2023

Cheerful Daisies Fractured Card

 As I mentioned before, I just love this technique!  So, I was trying to decide which cards to make in class next week and this one was a consideration! (I decided on the other "daisy" card), but I still wanted to share it! This one uses the border piece from the Fresh as a Daisy DSP pack, and I selected one of the daisies for the focal point!


Measurements:  

  • Copper Clay (N): 1/2 sheet, 4 strips @ 1/4" x 5"
  • Fresh as a Daisy DSP: 4" x 5 1/4" (border print), 2 1/4" square (with daisy)
  • Basic White: 2 1/2" square
To Make This Card:

  • Die cut 2" White Stitched Square from the Stitched Shapes Dies.
  • Attach this square where desired to the DSP, where desired. DO NOT ADHERE TO FRONT OF CARD, YET.
  • Next, take one 1/4" Copper Clay strip and lay from corner of square, along the cut edge of the square, and off the DSP layer. 
  • Then, lay the next strip, butting the end to the previously laid strip, and laying this one also along cut edge and off the DSP.  Repeat until all 4 strips are done.
  • Next, trim off the strips so that they are even with the DSP.
  • NOW, adhere the DSP layer to the folded Copper Clay card.
  • Decide what your focal point is going to be.  I die cut a stitched square from the DSP.  I would suggest trying to place the "daisy" on point so it's right side up!
  • Attach this to the center square.
  • Lastly, adhere the White piece inside. I like to add a strip of coordinating DSP to the inside.

Product List

Friday, September 15, 2023

Mystery Stamping - 2 Rectangles and a Focal Point #3

 I just love the possibilities of this layout!  So, I grabbed the Fresh as a Daisy DSP and coordinating dies and created this cardfor class next week! I love the Copper Clay and Boho Blue color combination along with the cheerful daisies! I hope they like it!


Measurements:  

  • Copper Clay (N): 1/2 sheet, 1 3/4" x 3", 2 1/4" x 3 3/4", 2 3/4" square (daisy base)
  • Basic White: 2 pcs @ 4" x 5 1/4", 3/4" x 2 1/4", 2 3/4" square (daisy)
  • Fresh as a Daisy (N): 1 1/2" x 2 3/4", 2" x 3 1/2", 1/2" x (5 1/4) or (4") strip, 2 1/2" square 
To Make This Card

  • Emboss one White layer and the 2 DSP pieces with desired Embossing Folder. I used the Cane Weave Embossing Folder.
  • Attach the White piece to folded Copper Clay card.
  • Attach each embossing DSP piece to its' corresponding layer. 
  • For this card my "focal point" is a die cut "daisy".  I decided to use the largest daisy and all 3 layers, but you can use whatever you'd like.
  • Assemble daisy.
  • Next, decide how you would like to arrange the 3 components on your card.  The choice is yours!
  • I decided on a landscape orientation, so I attached the larger rectangle to the left, and overlapped the smaller one on top, with Dimensionals.  
  • Then, I added the "daisy" also with Dimensionals.
  • I decided that I wanted a sentiment afterall, and stamped it in Copper Clay ink and added to the smaller rectangle.
  • Finish with InColor Dots.

Product List

Tuesday, September 5, 2023

Diagonal Split Pocket Gift Card Holder

I saw this awesome card/gift card holder, and then found out it was shared by my downline, Robin Armbrecht! This one is created with one of our Notecards/Envelopes, so it is smaller, but I hope to try it in a "normal" size as well, as it doesn't have to be a gift card holder.  Notice that the stamped daisy holds the top flap in place!  So cute, so many possibilities!


Measurements:  

  • Note Cards & Envelopes
  • Fresh As a Daisy (N): 3 1/2" x 5" (card), 2" x 5 1/8" (envelope flap)
  • Wild Wheat (N): scrap
  • Lemon Lolly (N): scrap
  • Basic White: scraps
To Make This Card:

  • Adhere DSP to front of Note Card.
  • Card front of card diagonally.  You can use any dimensions you'd like, but I measured down 2 1/2" from the top, right corner, and up 1 1/4" from lower, left fold. It's not easy to see your markings. I cut from the White side, or draw a pencil line to follow.
  • Next, make the gift card "pocket", by attaching the lower portion of your card to the inside with 1/8" Tear & Tape. Just tape the bottom and outside edges, leaving the top loose for a gift card, check or cash!
  • Now, let's decorate the front. You'll need to decide on a "theme"/"focal" point.  The stamped/die cut daisy holds the front circles into place!
  • For mine, I punched a 2" circle (Online Exclusives) from Wild Wheat scrap and Lemon Lolly from 1 3/4" circle punch (Online Exclusives) .
  • Stamp sentiment of your choice in Early Expresso onto Lemon Lolly. Attach the 2 circles together. 
  • Attach the circles with Dimensionals, so that the lower 1/3 of the circle is below the cut edge of the top layer.
  • Stamp "daisy" in black, as well as the "stem". Cut out with coordinating dies. Stamp "leaf" in Garden Green, die cut this one as well.
  • Attach the "daisy" over the circles, with a Dimensional.  Tuck stem underneath (you'll need to trim even with the Note Card), and attach "leaf".
  • Finish with a loop of Pebbled Path ribbon, and Glossy Dots.
  • Stamp desired sentiment inside.

Product List

Thursday, August 17, 2023

Clean & Simply Daisy Card

 I had yet to use the awesome card "panels" in the Fresh As a Daisy DSP. And, I had several frames laying around from another project using the Darling Details dies. I put them together and came up with this card that I had seen elsewhere. I still need to use the remaining "panels", so stay tuned!


Measurements:  

  • Bubble Bath (N): 1/2 sheet, scrap
  • Basic White: 3 3/4" x 4 7/8", scrap
  • Fresh as a Daisy (N): pink daisy panel
To Make This Card
  • Carefully cut "pink daisy panel" from larger DSP panel. Set aside.
  • Center and die cut the larger "eyelet" frame from the Darling Details Dies.
  • Attach the top of the "frame" to the folded Bubble Bath card front.
  • Tuck the "pink daisy panel" up and under the frame so the cut edge just  misses the edge of the "eyelets", making sure the bottom lines up the same distance from the bottom "eyelets". Then, attach.
  • Finish attaching the rest of the "frame" to the card front.
  • Stamp desired sentiment in Early Espresso onto scrap of White. Punch out with smooth oval from the Double Ovals Punch. Mount onto coordinating Bubble Bath scalloped oval layer.  Attach to card with Dimensionals.

Product List

Thursday, May 4, 2023

Cheerful Daisies Pop Up Vase

I think this Fun Fold has been around a short while, but I just found it thanks to fellow demonstrator, Dawn Griffith! I wanted to use the new Cheerful Daisies Bundle, since I was making cards for my month Stamp Club Meeting. This is my "original" design, but, you could use ANY floral set to recreate this card, and, you can add a "bouquet" of flowers, or just a single one!!  The choice is yours!  So, get creative and see what YOU can do!


Measurements:  

  • Thick Basic White: 1/2 sheet - card base
  • Basic White: 3 1/4" X 4 3/4" (3 daisies front), 3 1/2" x 4 3/4" (decorative inside piece); 3/4" x 3 7/8" (pull tab); 1/2" x 2" (anchor); scrap - sentiment
  • Garden Green: 4" x 5 1/4", scraps
  • Mint Macaron (ret): scraps
  • Crushed Curry: 3 1/4" x 4 3/4" (3 daisies inside in vase)
  • Fresh as a Daisy DSP (N): 2 1/4" x 5" (vase), 1 1/2" x 4" (strip) - Daisy Print; 4" x 5 1/4" Wild Wheat background
To Make this Card

  • Fold Thick Basic White cardstock in half to create base. Attach Garden Green layer to inside, right side. Set aside.
  • Score DSP "vase" along 5" at 3/4" and 1 1/2". Turn and score along 2 1/4" side 1" from each end.  Lightly crease.
  • Now, take your Paper Snips and make 2 snips along score lines up to 1" score line on each end.
  • On one end, cut away the 2 outside corners, and on the other end cut away the middle section. Set aside.
  • Score the 3/4" pull tab 3/8" from one end. Lightly crease.
  • Place Tear Tape on the "wrong" side of the middle tab.  Attach unscored end of "pull tab" to this vase tab with cut edge matching score edge make one long extended pull
  • Place Tear Tape on 3/8" end of "pull tab"
  • Lay the "vase/pull tab" out flat on inside left of card, with cut edge of "pull tab" (the end with the Tear Tape, up) even with the crease in the card. Close right side of card over Tear Tape.
  • Open up card flat, again, with everything still flat.
  • Next, take the small, "anchor" piece and place a small strip of Tear Tape on each end. Making sure that everything is laying even, attach "anchor" over "pull tab", near the "vase" end.
  • Lastly, fold "vase" back, up into place. Place Tear Tape onto "right" side of 2 outside "tabs". Carefully remove backing and fold these tabs back.
  • With "vase" laying flat, into closed place, tuck the tabs between the "pull tab" and close card, again. Press the area of the tabs to attach.  Now, open the card and the "vase" should pop up into place!
  • Now, to fill the "vase"!  Cut a variety of flowers and stems from the set you have chosen.
  • Place some images flat onto back of card above "vase". (I used 2 Garden Green and one Mint Macaron "sprigs") Then, add some cut flowers, stems and leaves, to the inside front of "vase". Use some "window sheet" extensions, if necessary. (I us!ed the 3 Daisy image, along with some die cut leaves).
  • Die cut a pretty insert from piece of White.  I stamped the small daisy image in Wild Wheat (N) ink!
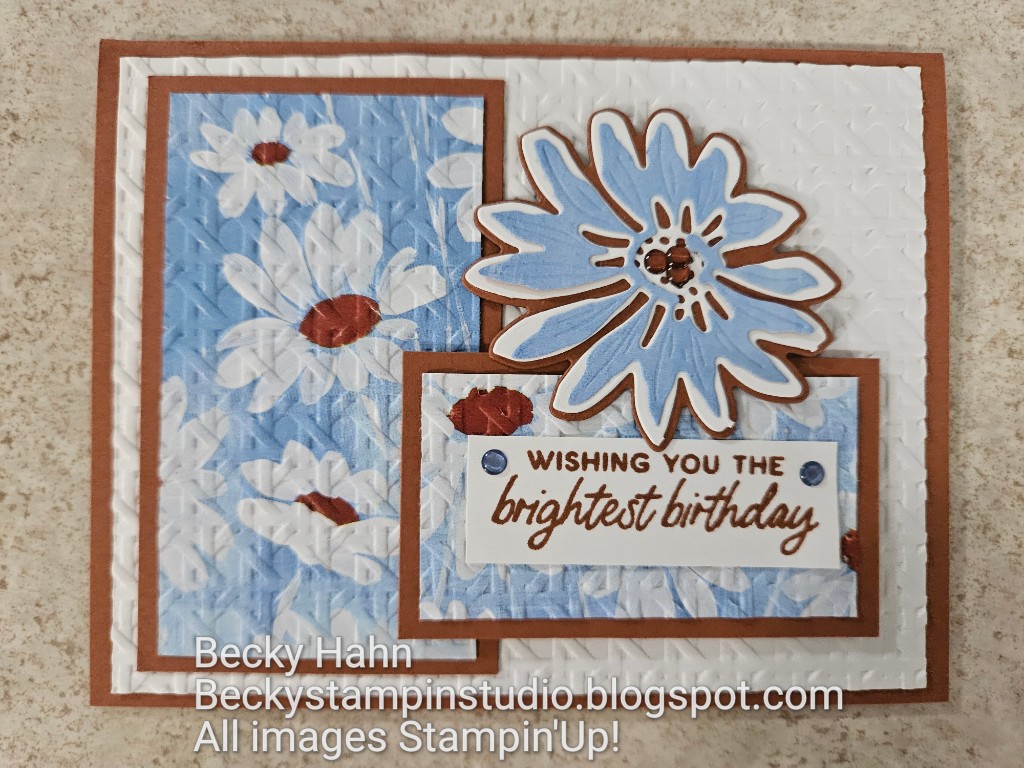
  • Design a simple, card front (put all your time and efforts on the inside), and Voila you are done!

Product List