
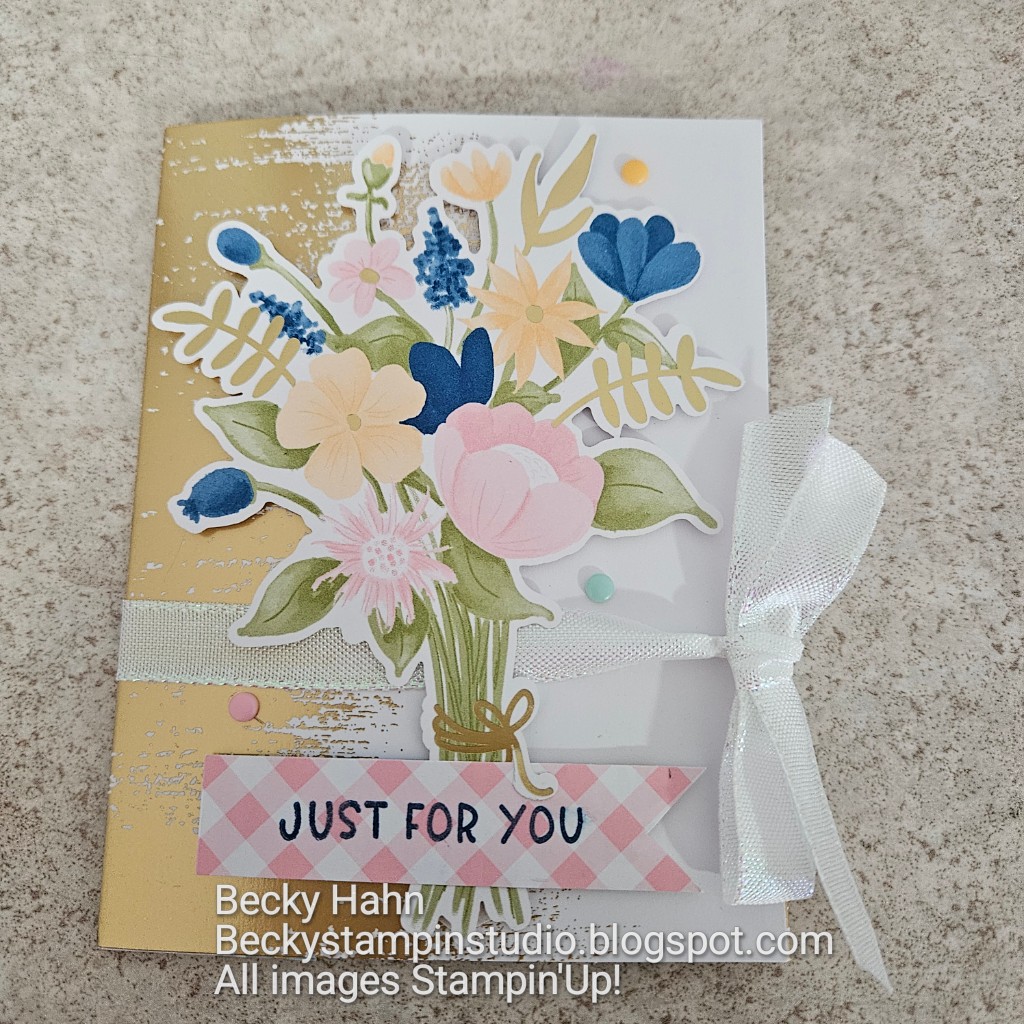
Want a "wow" card for that special person? Then this card is for you! This creation was designed by Patty Bennett and I will be sharing in a Specialty Class in April It utilizes the retiring Brushed Gold Cards and Envelopes, the Wildflower Birthday DSP, and our cute, new Flip Flaps. Just lay out all the die cuts, create your "base" and get to decorating!!


Measurements:
- Brushed Gold Cards & Envelopes: 2 cards and 1 envelope
- Brushed Gold: 4 pcs @ 2 5/8" x 3 5/8"
- Wildflower Birthday DSP (N): 3 pcs @ 4" x 5 1/4" (Pink Gingham, Peach Floral, Pool Party & Scalloped Gold Stripe); 3 1/2" x 4 1/2" (Pink Gingham - center panel); 2 pcs @ 3" x 4" (Pool Party & Scalloped Gold Stripe, Blue Floral); asst. card panels and die cuts
To Make This Card:
- Take the 2 Brushed Gold Cards and adhere them together with Tear n Tape, so that you create a Tri-Fold Card, with a double layer at the center.
- Adhere the 3 larger DSP pieces to the inside of the card, as desired.
- Then, I added a larger "panel" (with birthday cake) to the Left side, the Pink Gingham piece to the center (which will also hold the Flip Flaps), and just decorated the Right side, with stamped "label" and other die cuts.
- To prepare the 2 Flip Flaps, layer 4 smaller "panels" onto the Brushed Gold Pieces.
- Then, on the "cake" one stamp sentiment in Coastal Cabana and mount onto Blue Floral layer, the "balloon" onto the Gold Stripe layer.
- You need to keep in mind how the Flip Flaps will flip, as you assemble and stamp the layers that flip UP.
- On the other side of the "cake", flip it UP and stamp sentiment in Blueberry Bushel ink and add flower & leaf die cuts to the bottom. Slip into a 3" x 4" Flip Flap. This one is done!
- On the other side of the "balloon", flip it UP and add "bouquet" (with the gold layer) panel directly to the wrong side. Slip this, too into a 3" x 4" Flip Flap.
- Now, to add the Flip Flaps to the center of the card.
- Remove the backing on the adhesive strip. Fold this back so the insert opening is underneath. Line it up with the Pink Gingham cut edge and adhere.
- Repeat for the "balloon" piece adhering it under the top one.
- Finish by lining up the remaining gold-layered panel underneath, and adhering to Pink Gingham.
- Finish the Right outside flap with Birthday Cake die cut, 1/2" strip of Gold Scallop DSP, and 7/8" strip of Birthday Cakes DSP layered onto the outside edge.
- For the front, I used one of the large die cuts, popped up with Dimensionals. Stamp sentiment in Blueberry Bushel ink onto strip of Pink Gingham, and "flag" the end.
- Wrap 20" of ribbon around card and tie in a bow. Add scattered Party Dots.
![Heartfelt Hexagon Photopolymer Stamp Set (English) [ 162882 ]](https://assets1.tamsnetwork.com/images/EC042017NF/162882s.jpg "Heartfelt Hexagon Photopolymer Stamp Set (English) [ 162882 ]")
![Frosted Forest Photopolymer Stamp Set (English) [ 164344 ]](https://assets1.tamsnetwork.com/images/EC042017NF/164344s.jpg "Frosted Forest Photopolymer Stamp Set (English) [ 164344 ]")
![Labeled With Love Photopolymer Stamp Set (English) [ 163564 ]](https://assets1.tamsnetwork.com/images/EC042017NF/163564s.jpg "Labeled With Love Photopolymer Stamp Set (English) [ 163564 ]")
![Wildflower Birthday 12" X 12" (30.5 X 30.5 Cm) Designer Series Paper & Sticker Sheet (English) [ 166620 ]](https://assets1.tamsnetwork.com/images/EC042017NF/166620s.jpg "Wildflower Birthday 12\" X 12\" (30.5 X 30.5 Cm) Designer Series Paper & Sticker Sheet (English) [ 166620 ]")
![Brushed Silver And Gold Foil 12" X 12" (30.5 X 30.5 Cm) Specialty Paper [ 164861 ]](https://assets1.tamsnetwork.com/images/EC042017NF/164861s.jpg "Brushed Silver And Gold Foil 12\" X 12\" (30.5 X 30.5 Cm) Specialty Paper [ 164861 ]")
![Blueberry Bushel Classic Stampin' Pad [ 147138 ]](https://assets1.tamsnetwork.com/images/EC042017NF/147138s.jpg "Blueberry Bushel Classic Stampin' Pad [ 147138 ]")
![Coastal Cabana Classic Stampin' Pad [ 147097 ]](https://assets1.tamsnetwork.com/images/EC042017NF/147097s.jpg "Coastal Cabana Classic Stampin' Pad [ 147097 ]")
![3" X 4" (7.6 X 10.2 Cm) Flip Flaps [ 166513 ]](https://assets1.tamsnetwork.com/images/EC042017NF/166513s.jpg "3\" X 4\" (7.6 X 10.2 Cm) Flip Flaps [ 166513 ]")
![Tear & Tape Adhesive [ 154031 ]](https://assets1.tamsnetwork.com/images/EC042017NF/154031s.jpg "Tear & Tape Adhesive [ 154031 ]")
![Mini Glue Dots [ 103683 ]](https://assets1.tamsnetwork.com/images/EC042017NF/103683s.jpg "Mini Glue Dots [ 103683 ]")
![Stampin' Dimensionals [ 104430 ]](https://assets1.tamsnetwork.com/images/EC042017NF/104430s.jpg "Stampin' Dimensionals [ 104430 ]")
![Paper Snips [ 103579 ]](https://assets1.tamsnetwork.com/images/EC042017NF/103579s.jpg "Paper Snips [ 103579 ]")
![Iridescent 1/2" (1.3 Cm) Striped Trim [ 163299 ]](https://assets1.tamsnetwork.com/images/EC042017NF/163299s.jpg "Iridescent 1/2\" (1.3 Cm) Striped Trim [ 163299 ]")
![Party Dots [ 164602 ]](https://assets1.tamsnetwork.com/images/EC042017NF/164602s.jpg "Party Dots [ 164602 ]")
No comments:
Post a Comment