Showing posts with label Butterflies & Flowers Decorative Layered Masks. Show all posts

Thursday, February 3, 2022

Blended Background Windmill

Here is another simple "delft" card that I created using one of the Decorative Layered Masks and a Blending Brush and the Tulip Fields stamp set. I created this background on my Blending Brush video with this card in mind.

Measurements:  

  • Misty Moonlight: 1/4 sheet, scrap
  • Thick Basic White: 1/2 sheet
  • Basic White: 3 3/8" x 4 5/8" (pattern), scraps
To Make This Card

  • Cut largest scalloped contour die from Misty Moonlight quarter.  Adhere to folded Thick White Cardstock.
  • Attach Decorative Mask to White layer with low-tack tape.  Using a Blending Brush, burnish in Misty Moonlight ink.  Attach this over Misty Moonlight layer.
  • Cut large, white circle from Tasteful Labels Dies.  Cut small, Misty Moonlight circle also from Tasteful Labels Dies. Attach to center of card.
  • Next, stamp small "windmill" in Misty Moonlight onto scrap of white.  Cut out with corresponding die. Attach over circles with Dimensional.
  • Finish with a Classic Matte Dot and a knot of new, Denim ribbon.
Product List

Thursday, January 27, 2022

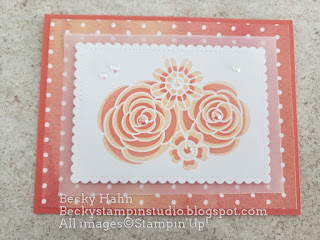
Coral Masked/Blended Flowers

Can you tell I just LOVE these masks!!  There are so many ideas swirling in my head!  I just love this color combination!  That's half the fun!!  Trying new color combinations! Love this coral combination using Calypso Coral and Pale Papaya!  Stay tuned.  Tomorrow video will show you how to use these awesome masks (stencils).

Measurements:  

  • Calypso Coral: 1/2 sheet
  • You're a Peach: 4" x 5 1/4"
  • Vellum: 3 3/8" x 4 5/8"
  • Basic White: 3 3/8" x 4 5/8"
To Make This Card:

  • Attach DSP to folded Calypso Coral card. Attach Vellum, as well.  Be sure to place the adhesive in the center, so it will be hidden by the next layer.
  • Attach "detailed" mask to White piece with removable tape.  Apply Pale Papaya ink to mask with Blending Brush, using a circular motion. Remove mask.
  • Next, move mask to larger floral image.  Line up center circles and attach over sponged image with removable tape. Apply Calypso Coral ink to mask with Blending Brush using circular motion. Remove mask.
  • Now, take this piece center and cut out with largest stitched, scalloped rectangle die.
  • Attach this piec to card with Dimensionals.
  • Finish with new, Iridescent Rhinestones!
Product List

Monday, January 24, 2022

Blended/Masked Flowers

I was seeing some lovely butterflies and flowers on card samples, and had no idea where they were coming from... Well, they were coming from a new set of Decorative Layering Masks from the January-June Mini Catalog. They are gorgeously fun!!  So many color possibilities!!  This would make a good instructional video as well!!  So, stay tuned!!  This one uses 2 shades of pink/purple to make the delicate flowers.  I mounted it on some pretty DSP from the FREE SAB Friendly Hello DSP.

Measurements:  

  • Fresh Freesia: 1/2 sheet
  • Friendly Hello DSP (N) (SAB): 4" x 5 1/4"
  • Basic White: 3 1/2" x 4 3/4"
To Make This Card:

  • Attach DSP to folded Fresh Freesia card.
  • Cut 2nd largest scalloped rectangle from White piece.
  • Attach "detailed" mask to White piece with removable tape.  Apply lightest ink color to mask with Blending Brush, using a circular motion. Remove mask.
  • Next, move mask to larger floral image.  Line up center circles and attach over sponged image with removable tape. Apply next shade of ink to mask with Blending Brush using circular motion. Remove mask.
  • Now, we'll add some "greenery".  There are 2 different types of greenery.  Select your desired "leaves" or mix and match.  You will move the "greenery" mask around to match the curves of your flowers.  Tape down, and repeat as above.
  • Note: you can easily re-sponge or add additional color simply by realigning mask!
  • Attach finished piece over DSP, with Dimensionals.
  • Finish with new, InColor jewels.
Product List