Showing posts with label let's go shopping. Show all posts

Tuesday, June 20, 2023

Les Shoppes "Z" Fold

This suite makes it so fun and easy to create cards.  You can stamp, you can fussy cut, or you can do both - as I did in this card.  So many possibilities! All you really need is the DSP, which is on sale right now! I saw this "Z" fold card, and knew that we needed to do it in class!!  I did stamp and color the "bakery" on the front, but I cut out the back "store".  Or, you could fussy cut them all out!  It's all up to you!  Shout out to "Stamp with Laurie" for the inspiration!


Measurements:  

  • Misty Moonlight (ret): 1/2 sheet cut LENGTHWISE, scrap (for awning)
  • Calypso Coral: scrap
  • Pecan Pie: scrap
  • Gray Granite: scrap
  • Basic White:4" x 5 1/4" (inside), scraps
  • Les Shoppes DSP (N): 2 1/2" x 4" (balmy blue print - front), 1" x 11" (cobblestones), one shop of your choice (fussy cut), one planter (die cut)
To Make This Card:

  • For the card base, fold the Misty Moonight cardstock in half, and then fold the front back on itself.  (Or, you can score at 2 3/4" and 5 1/2".)
  • Run the White inside layer through the new, Exposed Brick 3D Embossing Folder. Attach to inside of card.
  • Attach Blue Print DSP to front flap.
  • Score the "cobblestone strip" at 5 1/2" and 8 1/4". Crease well into a "Z" fold.
  • Attach long side of strip to front, and shorter strip to the inside.
  • Stamp "shop" in Memento Black ink onto piece of White. Add the "pastries" to the inside of the window. Also stamp a "sign".
  • Color the "shop" with Blends as listed below. Die cut with corresponding die.
  • Attach to card front, over "cobblestones" either flush or popped up. 
  • Stamp sentiment in Calypso Coral ink.  Cut out side (I prefer to hand cut this, but there is a die.) Attach to card front with Mini Dimensionals.
  • Now, die cut the 2 pieces of the "awning" from Misty Moonlight and Calypso Coral cardstock, as shown. Assemble together, and adhere over "window" with MIni Dimensionals.
  • Next, select another "shop" from the DSP.  Fussy cut out with Paper Snips.  Attach to inside of card on top of attached "Z".
  • Now, for the extra pieces.  Die cut a "planter" from the DSP, a park bench from a scrap of Pecan Pie cardstock, and a Lamp from a scrap of Gray Granite.  Note: To make the "lamp" a little sturdier, I attached a piece of White cardstock to the back of the Gray piece with an adhesive sheet, before cutting it out.
  • Attach these pieces to the "cobblestone strip" as shown.
  • To finish, die cut a rounded-edge rectangle from the new Nested Essentials Dies. Stamp desired sentiment in Misty Moolight.  Hide this piece behind the front, but onto the "brick" background.
Product List

Saturday, June 10, 2023

Stamped Let's Go Shopping

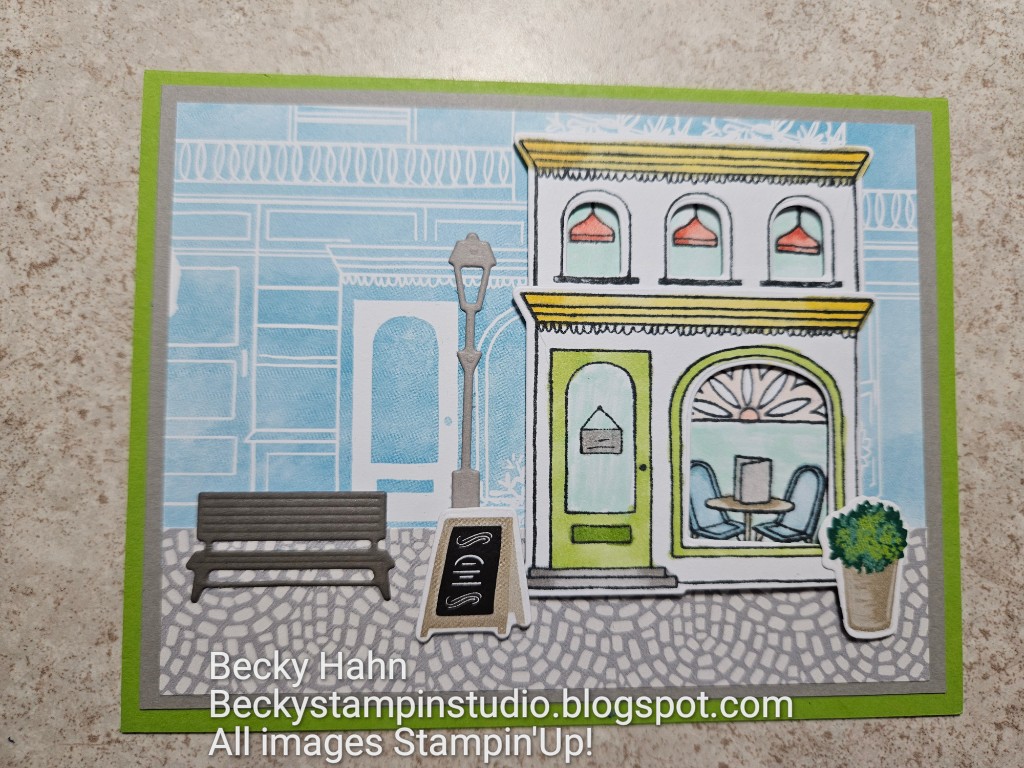
Well, I finally played with one of my favorite bundles from the new Annual Catalog - Let's Go Shopping! All you REALLY need is the gorgeously fun DSP, but there is also an awesome set of stamps & dies that go with it as well. The shops on the DSP are pretty much self-explanatory, but the stamps and dies - there is SO much you can do to personalize these.  And, if you love to color, this one is for you! Or, if you look closely, you can combine hand stamped with images from the DSP!  Too much fun!! My inspiration came from fellow demonstrator Amy Koenders.


Measurements:  

  • Granny Apple Green: 1/2 sheet
  • Gray Granite: 4" x 5 1/4", scrap
  • Pebble Path (N): scrap
  • Basic White: 1/4 sheet (stamped images) 4" x 5 1/4" (1 for inside)
  • Les Shoppes DSP (N): 3" x 3 3/4" (Balmy Blue buildings), 1" x 3 3/4" (Cobble Stones), die cut pot, placard
To Make This Card:
  • Adhere layering pieces to folded Granny Apple Green base card.  The 2 pieces of DSP overlap just a bit, so you don't have any gaps.
  • Next, on quarter-ish piece of white, stamp 2 "lower buildings", 2 "upper buildings" in Memento Black ink.
  • One set of "building" pcs you will only stamp and color the "details".  So, in the "lower building" stamp the arched decorative window and table and chairs. In the "upper building" you will stamp the 3 lights (which are all together on the stamp)
  • Now, we begin to color! I have listed the colors she used below (well, I used them, too).  The interesting thing, is the light Pool Party for the windows! ONLY COLOR THE PIECES WITHOUT THE DETAILS!!
  • Next, die cut the colored buildings, both the outlines and windows - I left the door.
  • For the "detailed" buildings - oh, you DO color the details - trim a little away so you have enough to adhere them together, but not enough that you can see it.
  • Adhere each corresponding detailed layer to its' front with Dimensionals.  Cool, huh.  Note: to line up the arched window, I should have been looking at the center of the "medallion" on the decorative window.
  • Attach "lower building" to card front.  Add "upper building" just above.  Can you imagine several stories to your buildings!!
  • Die cut a darling lamp post from Gray Granite cardstock, and a park bench from Pebble Path.
  • Also, find a decorative plant of flowers, and a placard on the DSP, and die cut those out as well.
  • Now, finish creating your street scene!!

Product List