Saturday, November 21, 2020

Filigree Curve

 I am lovin' this Curvy Bundle!!  This sample is a bit of a twist from my previous ideas.  If nothing else, the orientation is portrait, and I am using the more "filigree" border die.


Measurements:  

  • Thick Whisper White: 1/2 sheet, scraps
  • Cherry Cobbler: scraps
  • Classic Christmas DSP (N): 2 1/4" x 5 1/2"

To Make This Card:

  • Cut “filigree” curve in the front of folded Thick Whisper White card.  You want the cut edge of die about 1 ¼” from edge of card. Make sure the cut edge of the die is on the “outside”!!!
  • Attach DSP to inside of card.
  • Stamp sentiment onto scrap of Whisper White. Punch out with Label Punch. Edge with the edge of the Sponge dauber along the cut edge of the punch. Attach Cherry Cobbler “sprig” to label and attach label to card.
  • Stamp “bird” onto scrap of Whisper White.  Color with Dk Blend, cut out with corresponding die.  Attach to card with Mini Stampin’ Dimensional.
  • Finish with bow.
Product List

Friday, November 20, 2020

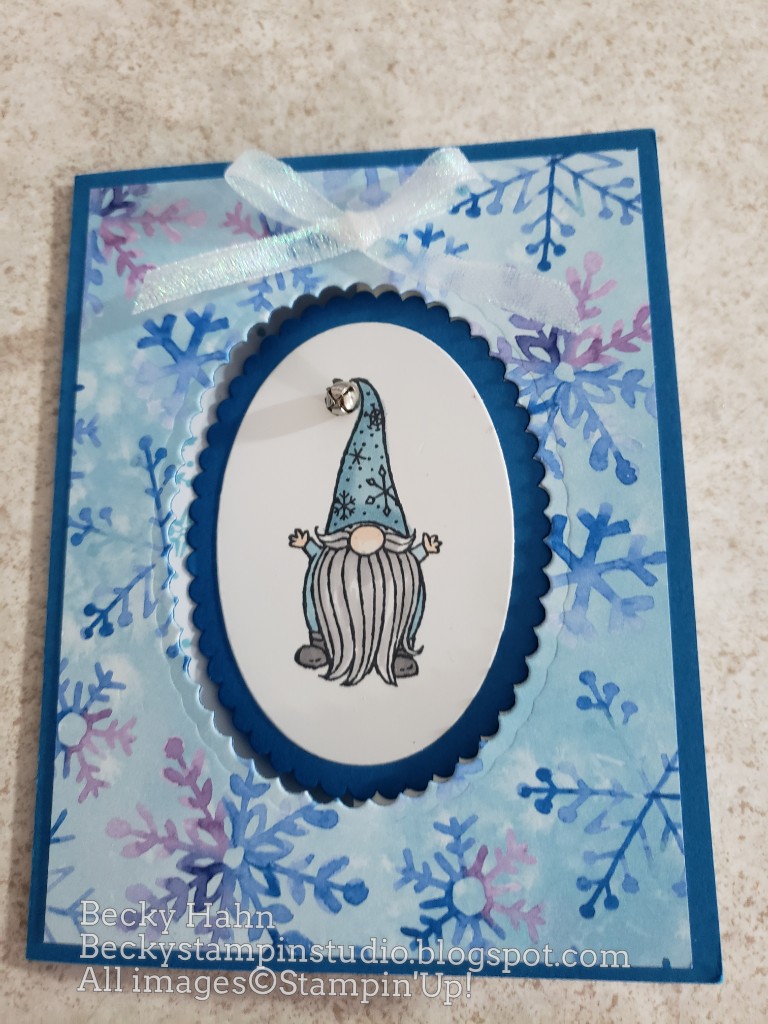
Gnome For the Holidays Side Pull Out Card

I saw this fold on our Demonstrator Website, and knew that I had to give it a try! It's a new one for me, and you can make it using Oval, Circle, or Square dies!  This is my own creation using the Ovals - my favorite, of course. I still would like to try the Circle and Square one, too!


Measurements:  

  • Pacific Point: 1/2 sheet
  • Whisper White: 5 1/4" x 8"  , 2 3/8" x 3 3/8"
  • Snowflake Splendor DSP (N): 4" x 5 1/4",1 7/8" x 5"                                                                   
To Make This Card:

  • Fold Pacific Point card base in half. Attach DSP quarter to front along outside edges only.
  • Cut largest scallop oval through both layers on front of card.  Discard DSP, and set Pacific Point piece aside to use later. 
  • Fold Whisper White card in half, and then again in half, back on itself, creating a "Z" fold. Crease well. Flip over so the "Z" is on the right, and adhere "base" to inside of Pacific point card. Attach DSP strip to inside narrow panel. 
  • Close card.  Place adhesive on right half of Pacific Point scallop oval. and adhere to front "z" that is inside while card is closed, lining up scallops.
  • Stamp image, in this case the gnome, onto Whisper White piece.  Cut out with Oval, color with Blends as shown, and attach to scalloped oval.  
  • Stamp sentiment in Balmy Blue on inside of card. Then, randomly stamp "snowflakes" in Balmy Blue on inside, and around front of "z", if desired.
  • Finish with a small bell or pom pom on the gnome's hat, and a Shimmery bow.
Product List

Thursday, November 19, 2020

 Mark your calendars!! Sale, sale, sale next Tuesday for 24 hours only! Some exclusions apply.


Classy Trim the Town

Need a quick and "clean" (classy) card, then this one is for you!  All you need is the Trimming the Town DSP and the Home Together dies!!


Measurements:  

  • Whisper White: 1/2 sheet
  • Misty Moonlight (N): 4" x 5 1/4"
  • Trimming the Town (N): 3 3/4" x 5" (mountains), Lg & Sm trees, tall house
To Make This Card:

  • Attach Misty Moonlight and DSP layers to folded Whisper White card.
  • Cut 1 small and one large tree from DSP.  Also cut one "tall" house.  Arrange onto card as desired. Attach with Dimensionals.
  • Finish with sentiment stamped in Misty Moonlight ink, and scattered "snowflakes".
Product List

Wednesday, November 18, 2020

Silver Foil Festive Curve

 Love a glitzy, glamorous card, and this one fits the bill!  The beautiful Feels Like Frost DSP, partnered with the Curvy Christmas  stamps and Curvy Dies!


Measurements:  

  • Seaside Spray: 1/2 sheet
  • Whisper White: 4" x 5 1/4", scraps
  • Feels Like Frost DSP (N): 3” x 5 ¼”                                                                                        
To Make This Card:

  • Attach Whisper White piece to folded Seaside Spray card.·        
  • Cut Silver DSP in half, with “dotty” curve die. Mount to card over Whisper White piece, leaving about a 1 ½” space. Trim DSP, if needed.  You decided where you would like the “dotted” piece.
  • Stamp “sprig” in Seaside Spray along upper curvy edge, leaving a space for the “bow”. The “sprig” should follow the curvy, so adjust, flip, curve stamp as needed.
  • Stamp “greeting” in black along lower along lower curve.  You CAN shape these photopolymer stamps to match those curves!!  
  • Stamp “bow” onto scrap of white.  Color with Blends.  Fussy cut with snips and attach to card between “sprigs”.
  • Finish with Rhinestones.
Product List

Tuesday, November 17, 2020

Copper Poinsettia Gift Card

Gorgeous slimline card in copper foil  that is designed to look like a gift!  This would be great to use as a gift card! It is so much more impression in person!

Measurements:  

  • Pretty Peacock: 7" x 8 1/2"
  • Copper Foil: 3 1/4" x 8 1/4", 1/2" x 8", 1/2" x 3"
  • Brightly Gleaming DSP (N): 3" x 8"

To Make This Card:
  • Cut the 3 Poinsettia Petals from the center of the Copper Foil layer, making sure that you still have 1/8" edge. Attach remaining piece to folded Pretty Peacock card. And then attach DSP on top of that to hide where you cut out the "petals".
  • Attach 1/2" strips on top of DSP, so that it looks like ribbon on a package.
  • Shape poinsettia "petals" with bone folder and assemble with a Dimensional between each layer. Attach to card over criss cross of 1/2" strips.
  • Finish by creating a flower center with one large pearl, and surrounding that large pearl with a circle of smaller pearls.

Product List