Friday, January 22, 2021

Mushroom Peek-a-Boo Flip Up

So, with my mojo returned, I created this Fun Fold card! I usually do this fold with a circle die, but I have also seen it done with other shapes, and the Snail Dies have an awesome square die! Not only are there dies to cut out the stamped images, some of the dies cut out images from the darling DSP, AND there are some cute, detailed "mushroom" dies as well.  See, I told you this was fun!  Again, I used the colors in the DSP as my color-guide!  Enjoy!!


Measurements:  

  • Real Red: 4 1/4" x 9 1/2", scrap
  • Whisper White: 4" square, 2" x 2 1/8" mini layer
  • Blushing Bride: 2 1/2" x 2 3/4", scrap
  • Bermuda Bay: scrap
  • Daffodil Delight: scrap
  • Pool Party: scrap
  • Snail Mail DSP(N): 2 3/4" x 4", 4" strip of pattern
To Make This Card:

  • Score the Red card base at 2 1/4". Turn cardstock, and then score at 3".  Crease well with Bone Folder.
  • Mark the stitched square die at the halfway mark with a Sharpie. Note: This die is not square!!  Decide which way you want your square to go.  I would recommend the longer side to follow the fold of the card!
  • Fold the top, narrower flap down.  Crease well.  Place tick marks on die along fold.  Run through Stamp & Emboss Machine through both layers. (This DOES work!) Toss away this square.
  • Attach Whisper White square to inside of card, hiding 1/2 of the square opening.
  • Cut Stitched Square Die from Blushing Bride cardstock. Close top flap, Attach Blushing Bride square through the opening.  Matching the "scallops", and adhere to the Whisper White base.
  • Match the Whisper White smaller "square" to the adhered cut. Remember this piece is NOT square.  Stamp "mushroom" so it will attach correctly to the Blushing Bride piece.
  • Color "Mushroom" with Stampin' Write Markers. as shown. (I used markers, because there is no Blushing Bride Blend!) Permanentlly attach to Blushing Bride "square".
  • Attach DSP to lower flap. This lower flap should miss the Blushing Bride "square", so trim if necessary.
  • Cut out die cut "mushrooms" from various scraps of cardstock as shown.  Punch out a circle and attach largest "mushroom" to it.  Place Dimensionals along bottom edge of circle.  Close top flap.  Overlap punched circle so it holds down upper flap.  Adhere.
  • Finish card with strip of "mushroom" DSP to inside of card, along with 2 smaller die cut mushrooms.  I also added a triple bow of  Blushing Bride Twine.
  • Stamp sentiment of your choice under "square" opening in Memento Black.
Product List
Pool Party Stampin' Write Marker
[131904]
$3.50
Daffodil Delight Stampin' Write Marker
[119677]
$3.50
Real Red Stampin' Write Marker
[100052]
$3.50
Blushing Bride Stampin' Write Marker
[131265]
$3.50

Wednesday, January 20, 2021

Rococo Ombre Snail

Good morning, Stampers!  This is one of the cards I copied this weekend to jumpstart my mojo!  I did not originally get the Snailed It Bundle, but it is so stink' cute!! I love ovals, as you know, so this was a hit for me right from the start.  And, then it uses the FREE SAB DSP - Oh, So Ombre - in the soon-to-be-retired, Rococo Rose!!

Measurements:  

  • Whisper White: 1/2 sheet, 2" x 3" (oval), scraps
  • Basic Black: 4" x 5 1/4", 2" x 3" (scallop oval), 1 3/4" x 3 3/4"
  • Oh, So Ombre (N): 3 3/4" x 5" (circles), 1 1/2" x 3 3/4" (ombre)
To Make This Card:
  • First of all, I cut off (yes, cut off) the words from the Snail stamp.  I feel like it makes this stamp more versatile. I used my old "rubber" scissors.
  • Layer the Black and Ombre DSP pieces together, and then add to folded Whisper White card. Attach the Ombre strip to the Basic Black strip.  Set this one aside.
  • Cut out 1 smooth Oval from Whisper White and 1 scallop Oval from Basic Black.  Layer together and set aside.
  • Stamp trimmed "snail" in Memento Black ink onto scrap of White. I colored the Snail "body" with Rococo Rose ink and a Blender  Pen. The "shell" and "letter" are colored with Blends. Cut out with coordinating die.  Mount onto Whisper White Oval.
  • Stamp 3 "hearts" above "snail". I also colored these with Rococo Rose ink and a Blender Pen,  Attach this to the Ombre strip, and then add to card front.
  • Stamp the "conversation bubble" in Black onto scrap of White.  Add sentiment.  Cut out with corresponding die. Add to card where desired.
  • Finish with 2-6mm Googlie Eyes!
Product List

Tuesday, January 19, 2021

Curvy Mushroom

 This is another card that I CASED this weekend! I love the curvy, clean lines and bright colors!


Measurements:  

  • Whisper White: 1/2 sheet, 3" x 5 1/4" (curvy layer), scrap
  • Snail Mail DSP(N): 2 1/2" x 5 1/4"
To Make This Card:
  • Attach Bermuda Bay DSP to folded Whisper White card.  
  • Cut "dotty curve" from smaller Whisper White piece by lining up left edge of die and cutting with Stampin n Emboss Machine. Attach to card over DSP.  You will need to trim the bottom of this layer with the Paper Trimmer, so 1/8" shows from bottom layer of card.
  • Stamp sentiment in Memento Black.  Add Real Red Resin Dot at the end.
  • Stamp "mushroom" in Memento Black.  Color with coordinating Blends as shown. (I use the colors from the back of the DSP).  Cut out with corresponding die. Attach to card with Dimensionals.
Product List

Monday, January 18, 2021

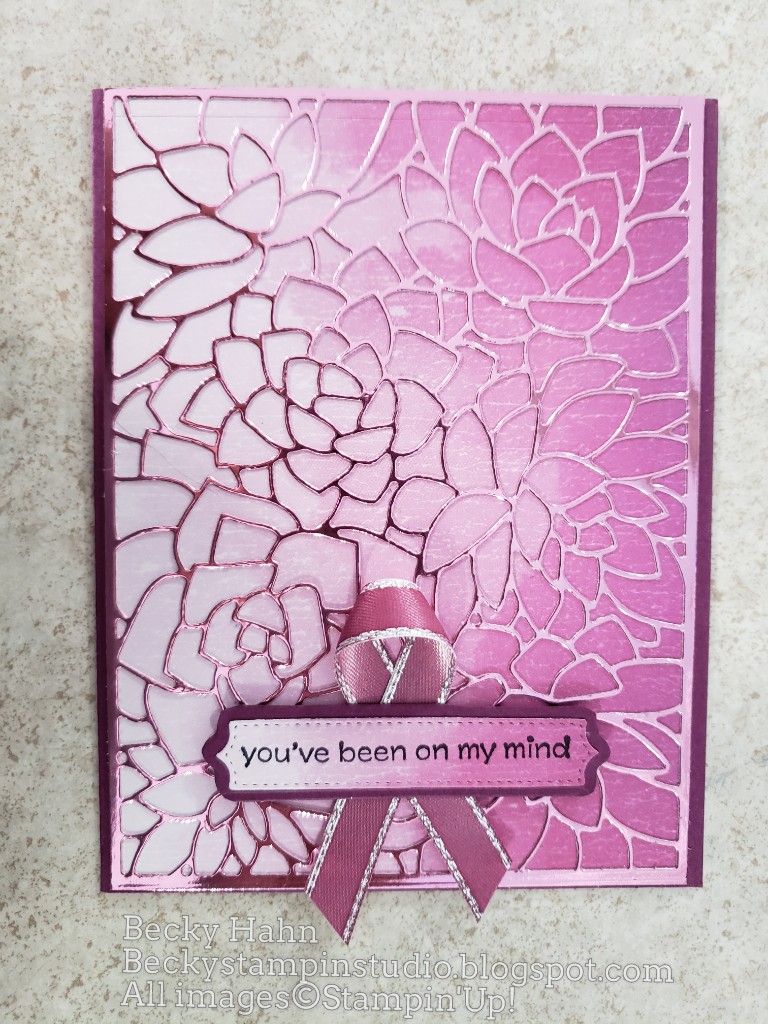
Foil Succulent Frame

This card I designed in my sleep! Yes, it does happen sometimes! It is absolutely gorgeous in person! It features my favorite Love You Always Foil sheets and an awesome new Succulent Detail Frame from the Potted Succulents Dies.

Measurements:  

  • Rich Razzleberry: 1/2 sheet,scrap
  • Artistry Blooms DSP: 4" x 5 1/4", scraps
  • Love you Always Foil (N): 1/4 sheet
To Make This Card:
  • Color Silver Edge Ribbon with Lt Rich Razzleberry Blend.  Set aside to dry.
  • Run quarter sheet of Rococo Rose Foil through Succulent "Frame".  Attach to Artistry Blooms DSP that coordinates with the Rococo Rose Foil. Note:I used the Multipurpose Liquid Glue and a piece of sponge on the silicone mat. Trim, if necessary. Then, attach to Rich Razzleberry card.
  • Stamp sentiment in Memento Black ink onto scrap of Artistry Blooms DSP.  Cut out with long label die in the Potted Succulents Dies.  Trace around outside of long label die with a pencil.  Cut out with paper snips.  Note: This makes an awesome layer!  Adhere both pieces together.
  • Make a loop of the colored ribbon and attach behind "label".  Attach to card, where desired, with Dimensionals.
Product List