Showing posts with label daffodil daydream. Show all posts

Thursday, February 17, 2022

Pink Daffodil Funky Fun Fold Card

This is a pastel version of my Daffodil Daydream Funky Fun Fold card shared in my video.  I hadn't used the more pastel papers in the FREE, SAB Daffodil Afternoon DSP so decided to give it a try. I also decided that I wanted to see more of the DSP, so I added it to the outside front flaps instead of the center.  I DO like this change!!  So many possibilities for this fold!!


Measurements:  

  • Very Vanilla: 5 1/2" x 7", 2 pcs @ 2 1/2" x 3 1/4", scrap
  • Flirty Flamingo: 2 3/4" x 5 1/2", 2 pcs @ 2 3/4" x 3 1/2"
  • Petal Pink (opt): 2 5/8" x 3 3/8"
  • Daffodil Afternoon DSP (N): 2 pcs @ 1 1/8" x 5 1/2"
To Make This Card:

  • Score Vanilla base at 1 3/8" from each side. Crease well.
  • Next, attach the DSP pieces to the outside front flaps.
  • For this version, you will need to place the Flirty Flamingo strip inside, overlaping the LEFT side about 5/8". Attach to this side. 
  • Next, we'll work on the 2 layered rectangles. Take one Vanilla piece and attach to a Flirty Flamingo rectangle. (This will go inside.) Set this aside. 
  • Take the other 3 rectangles and layer together. (there will be only a 1/16" border.
  • Stamp the single Daffodil in Memento Black onto scrap of Vanilla.  Color with Blends and cut out with corresponding die.  Attach to rectangle with Dimensionals.
  • Now, center this piece on front of card.  Attach to the RIGHT flap.
  • For placement of the inside piece, place behind the corresponding front piece and attach.
  • Finish with Polished Dots and a little Wink of Stella
Product List

Tuesday, February 15, 2022

Basic Daffodil Funky Fun Fold

This was my original Funky Fold using the Daffodil Daydream Bundle. I decided to try a black base with embossing for this one. Please take note, that I colored the Vanilla daffodils yellow, with a Dk Daffodil Blend!  This makes a nice addition. to this card.  I also added some Bumblebee Ink with a Blending Brush around the edges of both the outside and inside Vanilla pieces! This is a nice, darker version of the pink one.


Measurements

  • Basic Black: 5 1/2" x 7", 1/4 sheet (opt)
  • Old Olive: 2 3/4" x 5 1/2", 2 pcs @ 2 3/4" x 3 1/2"
  • Daffodil Afternoon DSP (N): 1 1/8" x 5 1/2
  • Very Vanilla: 2 pcs @ 2 1/2" x 3 1/4", scrap
To Make This Card:

  • Score Black base at 1 3/8" from each side. Crease well.
  • Run this folded card base through Timeworn Type 3D Embossing Folder, if desired, for more stability, you can add a quarter sheet to the back..
  • Take the daffodil DSP piece and color all the Vanilla flowers with a Dark Daffodil Blend.  Then, attach the DSP piece to the center of the larger, Old Olive piece.
  • Now, place it inside the card base, so that the 2 outside flaps overlap, equally (about 1/8") onto the Old Olive piece.  Attach this JUST to the LEFT side of your card.  Set the card base aside.
  • Next, we'll work on the 2 other layered pieces. Take one Vanilla piece, brush around the edges with Bumblebee ink and attach to a Old Olive rectangle. (This will go inside.) Set this aside.
  • Run the other Vanilla rectangle through the Timeworn Type 3D Embossing Folder.  Brush around these edges as well and then adhere to the other Old Olive rectangle.
  • Stamp single daffodil onto scrap of Vanilla.  Color with Blends as shown. Cut out with corresponding die.  Attach to Vanilla piece with Dimensionals.
  • Next, center this piece on front of card.  Attach to the RIGHT flap.
  • For placement of the inside piece, place behind the corresponding front piece and attach.
Product List

Tuesday, January 25, 2022

Diagonal Daffodil Fold

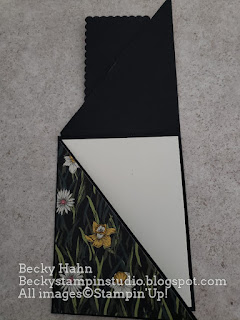
Here is a fold that I haven't done in a LONG time. It's a diagonal cut fold.  You take a full sheet of cardstock and cut it in half, diagonally making 2 cards with the same cut. I used the FREE SAB DSP, Daffodil Afternoon, which was perfect for this card fold! Along with the coordinating Daffodil Daydream Bundle.  


Measurements:  

  • Basic Black: full sheet cut in half DIAGONALLY, 2 3/4" x 4"
  • Very Vanilla: 4" x 5 1/4", 2" x 3 1/4", scrap
  • Daffodil Afternoon DSP: 2 prints @ 4" x 5 1/4" cut diagonally (you will only need 1/2 of each) the other half will make another card.
To Make This Card:

  • Cut full sheet of cardstock in half Diagonally.  
  • You can fold by either folding points into place an creasing with a bone folder, or you can place into a paper trimmer or score board and score the lines at 4 1/4" and 5 1/2" anc then creasing with bone folder.
  • Attach DSP to each diagonal fold.  It will have a 1/16" -1/8" border.  Note: be aware of any directional patterns! With these daffodils, the matching card will have the DSP pieces switched so the daffodils can remain upright.
  • Cut Stitched Scalloped Rectangle from the 3rd largest Color and Contour dies. Attach the cut Very Vanilla piece on top.
  • Stamp single "daffodil" onto scrap of Vanilla.  Color in with Blends as shown.  Cut out with corresponding die.  Attach to rectangle with Dimensionals.
  • Now, attach this rectangle to one diagonal piece. i.e. HALF of the rectangle.  Note: this will not go from corner to corner of the rectangle. I don't know why...
  • Attach Vanilla piece inside card.  FInish as desired.
  • Finish outside with bow of Bumblebee Ribbon and scattered InColor Bumblee Dots.
Product List

Tuesday, January 4, 2022

New Daffodil Daydream

We have an awesome, new Daffodil bundle!  The dimensional flower dies are just gorgeous!!  I can't wait to play with them, and what is even more awesome, there is some Daffodil DSP available for FREE with Sale-a-Bration (SAB)!! So, stay tuned!!  This card I also designed for my Senior Center gals.  It uses the Daffodil Daydream stamp set along with the Host Pattern Party DSP and a little coloring with Blends!

Measurements:  

  • Basic White: 1/2 sheet, 3" x 4", 1 1/2" x 2 3/4"
  • Pattern Party DSP: 4" x 5 1/4" (granny apple print)

To Make This Card:

  • Attach DSP to folded White card.
  • Cut 3rd largest stitched scalloped rectangle from the Scalloped Contour Dies in White.  Also cut the small white scalloped "tag" die from White as well.
  • Stamp the 3 daffodils in Memento Black onto larger scalloped piece.  Stamp a sentiment onto the scalloped "label".
  • Color the Daffodils in Blends as shown. Add Wink of Stella to flowers.
  • Attach rectangle to card with Dimensionals.  Add sentiment as well.  You can arrange them any way you wish.
  • Finish with Daffodil self-adhesive sequins. and a small daffodil bow. (retired SAB ribbon).
Product List