What a card!! I just love it! I've never seen this one before!! Thanks to Verna Mullen's expert direction, I was able to complete 2 of her creations yesterday (of course, with my own touches!). This was my first attempt with the gorgeous Wildflower Birthday DSP! I was pleased with how it turned out! Not really that difficult to do, and so much fun deciding which die cuts to use!! Hmmm, may have to have an extra class on this one! Enjoy! So many layers to take in!
Measurements:
- THICK Basic White: 1/2 sheet
- Basic White: 5 pcs @ 2 1/4" x 3 1/2" (arched layers)
- Wildflower Birthday DSP (N): 4" x 5 1/4" front (pastel stripe); 2 1/2" x 12" center strip (pink check); 2 pcs @ 3" x 4 1/4" medium arch (pool party & gold print); 3 pcs @ 3" x 4 1/4" medium arch (soft sea foam print)
To Make This Card:
- Adhere stripe DSP piece to folded Thick White card base.
- Die cut 3rd from the largest Everyday Arches dies from the front, through all layers. Remove center.
- Then, take the removed piece and adhere through the created "window" to the back, inside of the card base.
- Next, take the 12" DSP strip and score at 4" - 8". Fold into thirds. (you may need to trim the ends so it lays flat.) You will want the left flap on top.
- Place Green Glue on the center section of this strip, and adhere to inside arch, centering between the fold and cut edge of the card base, and about 1/2" above bottom edge of large arch.
- Now to attach the medium DSP arches!
- Die cut the 2 Pool Party & Gold and 3 Soft Sea Foam Print "medium" arches from the 5th from the largest Everyday Arches Dies.
- While you are at it, die cut 5 smallest arches from the 7th largest Everyday Arch Dies. Set these aside for now.
- Next, close the card, with the Pink Check strip showing through the arched window.
- Take one of the Pool Party and Gold arches and adhere to that strip, through the window, and centering in the arch "window". Note: I used Green Glue to slide it around. You will want to put the adhesive on the strip, and not the entire arch!
- Open the card, and adhere one of the Soft Sea Foam arches to the wrong side of the Pool Party one. You can add Green Glue to this entire arch.
- The key to this working, is for all of the arches to be laying on top of one another!
- Next, we'll add the arch pieces to the right flap. Open up the card, leaving the Pink Check folded in.
- Take last Pool Party arch, and line it up, right sides together, on top of the Soft Sea Foam arch on the other side. Using the placement of the Pink Check Strip as a guide, place Green Glue on this arch ONLY in the area that will touch the strip.
- Now, carefully fold the right side of the card into place catching the arch to the strip as you fold. Open, check placement. And press well. (Using green glue gives you a little time to adjust if necessary.)
- Open up the right flap, and adhere one Soft Sea Foam piece to the wrong side of the Pool Party piece.
- Now for the last medium arch. Open up strip. Place Soft Sea Foam piece onto the already glued piece, right sides together. Place glue on entire arch piece, then carefully fold right side into place, adhering arch to back, center.
- It's really not as difficult as it seems. If you've made cards with me in the past, you'll know that's how I line things up. If you prefer, you can just "eyeball" the placement!
- Now for the fun part...the decorating! Let's start with the front White arch.
- I stamped the sentiment in Summer Splash ink (my Pool Party ink is too light). Select die cuts to add to front. Adhere to the front arch, centering in the arch. The bottom edge of the smaller arch, should match to bottom of the strip!
- Then, continue with the other White arches as desired. I did stamp my "main" sentiment on the "center, inside" arch, using the stamps from the Birthday Celebration stamp set that coordinates with the DSP.
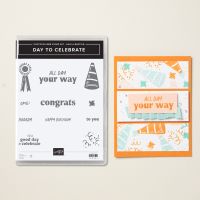
- I also added some additional sentiments with stamps from the, now retired, SAB set Day to Celebrate.
- Just to note - the small cake slice I fussy cut from one of the tags (I've done this before), and the large cake is actually on a cake stand, I just cut it off!
- Finish with a few scattered InColor Shimmer Gems.


![Birthday Celebration Photopolymer Stamp Set (English) [ 164592 ]](https://assets1.tamsnetwork.com/images/EC042017NF/164592s.jpg "Birthday Celebration Photopolymer Stamp Set (English) [ 164592 ]")
![Wildflower Birthday 12" X 12" (30.5 X 30.5 Cm) Designer Series Paper & Sticker Sheet (English) [ 166620 ]](https://assets1.tamsnetwork.com/images/EC042017NF/166620s.jpg "Wildflower Birthday 12\" X 12\" (30.5 X 30.5 Cm) Designer Series Paper & Sticker Sheet (English) [ 166620 ]")
![Brushed Silver And Gold Foil 12" X 12" (30.5 X 30.5 Cm) Specialty Paper [ 164861 ]](https://assets1.tamsnetwork.com/images/EC042017NF/164861s.jpg "Brushed Silver And Gold Foil 12\" X 12\" (30.5 X 30.5 Cm) Specialty Paper [ 164861 ]")
![Pool Party 8-1/2" X 11" Cardstock [ 122924 ]](https://assets1.tamsnetwork.com/images/EC042017NF/122924s.jpg "Pool Party 8-1/2\" X 11\" Cardstock [ 122924 ]")
![Basic White 8 1/2" X 11" Cardstock [ 166780 ]](https://assets1.tamsnetwork.com/images/EC042017NF/166780s.jpg "Basic White 8 1/2\" X 11\" Cardstock [ 166780 ]")
![Nested Essentials Dies [ 161597 ]](https://assets1.tamsnetwork.com/images/EC042017NF/161597s.jpg "Nested Essentials Dies [ 161597 ]")
![Versamark Pad [ 102283 ]](https://assets1.tamsnetwork.com/images/EC042017NF/102283s.jpg "Versamark Pad [ 102283 ]")
![Metallics Wow! Embossing Powder [ 165678 ]](https://assets1.tamsnetwork.com/images/EC042017NF/165678s.jpg "Metallics Wow! Embossing Powder [ 165678 ]")
![Heat Tool (Us And Canada) [ 129053 ]](https://assets1.tamsnetwork.com/images/EC042017NF/129053s.jpg "Heat Tool (Us And Canada) [ 129053 ]")
![Stampin' Dimensionals [ 104430 ]](https://assets1.tamsnetwork.com/images/EC042017NF/104430s.jpg "Stampin' Dimensionals [ 104430 ]")
![Bone Folder [ 102300 ]](https://assets1.tamsnetwork.com/images/EC042017NF/102300s.jpg "Bone Folder [ 102300 ]")
![Paper Trimmer [ 152392 ]](https://assets1.tamsnetwork.com/images/EC042017NF/152392s.jpg "Paper Trimmer [ 152392 ]")
![Gold 1 1/2" (3.8 Cm) Open Weave Trim [ 165715 ]](https://assets1.tamsnetwork.com/images/EC042017NF/165715s.jpg "Gold 1 1/2\" (3.8 Cm) Open Weave Trim [ 165715 ]")
![Party Dots [ 164602 ]](https://assets1.tamsnetwork.com/images/EC042017NF/164602s.jpg "Party Dots [ 164602 ]")


![Heartfelt Hexagon Photopolymer Stamp Set (English) [ 162882 ]](https://assets1.tamsnetwork.com/images/EC042017NF/162882s.jpg "Heartfelt Hexagon Photopolymer Stamp Set (English) [ 162882 ]")
![Labeled With Love Photopolymer Stamp Set (English) [ 163564 ]](https://assets1.tamsnetwork.com/images/EC042017NF/163564s.jpg "Labeled With Love Photopolymer Stamp Set (English) [ 163564 ]")
![Brushed Gold Cards & Envelopes [ 162177 ]](https://assets1.tamsnetwork.com/images/EC042017NF/162177s.jpg "Brushed Gold Cards & Envelopes [ 162177 ]")
![Blueberry Bushel Classic Stampin' Pad [ 147138 ]](https://assets1.tamsnetwork.com/images/EC042017NF/147138s.jpg "Blueberry Bushel Classic Stampin' Pad [ 147138 ]")
![3" X 3" (7.6 X 7.6 Cm) Flip Flaps [ 166514 ]](https://assets1.tamsnetwork.com/images/EC042017NF/166514s.jpg "3\" X 3\" (7.6 X 7.6 Cm) Flip Flaps [ 166514 ]")
![Heartfelt Hexagon Punch [ 162888 ]](https://assets1.tamsnetwork.com/images/EC042017NF/162888s.jpg "Heartfelt Hexagon Punch [ 162888 ]")
![Round We Go Dies [ 163729 ]](https://assets1.tamsnetwork.com/images/EC042017NF/163729s.jpg "Round We Go Dies [ 163729 ]")
![Tear & Tape Adhesive [ 154031 ]](https://assets1.tamsnetwork.com/images/EC042017NF/154031s.jpg "Tear & Tape Adhesive [ 154031 ]")
![Mini Glue Dots [ 103683 ]](https://assets1.tamsnetwork.com/images/EC042017NF/103683s.jpg "Mini Glue Dots [ 103683 ]")
![Paper Snips [ 103579 ]](https://assets1.tamsnetwork.com/images/EC042017NF/103579s.jpg "Paper Snips [ 103579 ]")
![Iridescent 1/2" (1.3 Cm) Striped Trim [ 163299 ]](https://assets1.tamsnetwork.com/images/EC042017NF/163299s.jpg "Iridescent 1/2\" (1.3 Cm) Striped Trim [ 163299 ]")
![Gold Textured Adhesive Backed Dots [ 164027 ]](https://assets1.tamsnetwork.com/images/EC042017NF/164027s.jpg "Gold Textured Adhesive Backed Dots [ 164027 ]")