Showing posts with label frosted gingerbread. Show all posts

Thursday, December 2, 2021

Pull Tab Flip Gift Card Holder

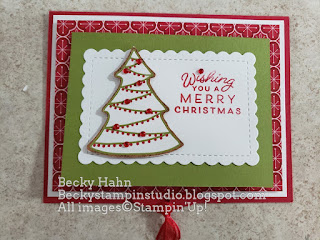
I love to make these cards, but haven't done one in a while, as the Classic Label Punch that we used for the Pull Tab has retired.  Well, you CAN use a narrow die of your choice, OR the Classic Label Punch is currently on sale in the Clearance Rack!!  I have never done one with a landscape orientation or with a larger flip.  So, here is my version that I also made into a Gift Card Holder....a "Becky Original".


Measurements:  

  • Real Red: 1/2 sheet, 2" x 6" (pull tab), 2 3/4" x 4"
  • Old Olive: 3 1/4" x 4 3/8"
  • Basic White: 4" x 5 1/4", 2 pcs @ 2 3/4" x 4"
  • Heartwarming Hugs DSP (N): 3 3/4" x 5"
  • Gingerbread & Peppermint DSP (N): 1 5/8" x 3 7/8" (stripe), die cuts - tree, mints
To Make This Card:

  • Attach Basic White piece to folded Real Red card. 
  • Score "pull tab" at 2" and 2 1/2".  Crease well with Bone Folder.  Punch Tag Punch along "longer" end.
  • Center Classic Label Punch (or use a  long, narrow die of your choice) along long side of DSP, push in all the way. Punch.  This needs to be roughly in 2" for this fold.
  • Crease along first score line.  
  • Place Seal+ (Tear & Tape) along 1/2" area between score lines.  Center & attach the Olive rectangletear, lining cut edge to scored line.
  • Now, insert Pull Tab through the punched slit. Pull until the Olive piece flips up. Place Tear & Tape on the exposed Red Pull Tab, near the crease.  Attach Red Rectangle to Pull Tab.
  • Place Seal+ (Tear & Tape) on underside of Red rectangle. Center this piece in center of card, and attach attach to DSP.
  • Pop up DSP with "pull tab" using Dimensionals.  Be sure to keep Dimensionals away from sliding "pull tab".  Attach to card front. Check to make sure the Pull Tab still works!
  • Cut 2 Stitched Rectangles from Scalloped Contour Dies. Attach one to the inside on the Old Olive piece.  Add a couple die cut mints.  This is where you can write your message!
  • On the Red, inside piece, attach DSP "pocket" with 1/8" Tear & Tape.  Decorate with a few more die cut mints.  Tuck your gift card here!
  • On the other White rectangle, stamp sentiment in Real Red in upper Right corner. Attach to Old Olive front.
  • Fussy cut a tree, and attach to White piece with Dimensionals.
  • Finish by attaching small piece of Sheer Red Ribbon to Pull Tab, and decorate tree with Red Rhinestones!
Product List

Wednesday, November 17, 2021

Gingerbread Corner Tuck Fold

I am still in love with the Frosted Gingerbread Bundle!  Love, love, love the DSP.  I am actually OUT of a few sheets!!  I saw a version of the Corner Tuck card, and just had to share!  This is our version!

 Measurements:  

  • Old Olive: 1/2 sheet cut LENGTHWISE, 1 1/8" square
  • Gingerbread & Peppermint DSP (N): 2 different pcs @ 2 1/2" x 4", 1 "tree", scrap
  • Basic White: 4" x 5 1/4", 2" x 3 1/4"
To Make This Card

  • Fold Old Olive piece in half. Trim 2 3/4" from front flap.  Set aside.
  • Attach White piece to inside.
  • Attach one piece DSP to left front flap.  Attach the other to the trimmed off piece.
  • Fussy cut one "tree" from printed DSP.  Set aside.
  • Stamp sentiment in Real red onto small white piece.  Cut out with Scalloped Contour Die, with the sentiment over to the right. Attach to trimmed piece. 
  • Cut square of Old Olive diagonally.  You will use only one piece.  Save the other for another card, or share with a friend.
  • Cut the triangle layer with the Stitched Triangles.  Attach to Olive Triangle.
  • Attach this layered triangle piece to the card with 1/8" Tear & Tape.
  • Now you can add the "trimmed piece" to the left flap of card. Tuck the corner under the triangle, and attach the left half of this piece to the left front flap.
  • Add your trimmed tree to this piece, with Dimensionals.
  • FInish with Red Rhinestones.
Product List

Sunday, November 7, 2021

Slimline Frosted Gingerbread Card

 Mom and I set out to create a Slimline card for Stamp Club, using the 2 piece Frosted Gingerbread dies! I love how this turned out!  Yes, a "Becky Original"!!  I love how these "Frosted Cookies" look!  No Gingerbread MAN, but awesome Gingerbread COOKIES!!


Measurements:   

  • Real Red: 7" x 8 1/2", strip 1" x 6"
  • Heartwarming Hugs DSP: 3" x 8", scrap
  • Basic White: 3 1/4" x 8 1/4", 2 1/2" strip (frosting), 1 1/2" x 2 3/4" (label)
  • Kraft (N): 2 1/2" strip (cookies)
  • Gingerbread & Peppermint DSP (N): peppermint die cuts
To Make This Card:

  • Score Real Red Base at 3 1/2".
  • Attach DSP Layer
  • Attach ribbon to front of card. Cut edges even with cut edges of DSP.
  • Cut 3 "cookies" from new Kraft paper.
  • Cut corresponding "frosting" from White.  Glue together.
  • Stamp sentiment in Real Red onto scrap of White.  Cut out with Scalloped Contour Die.
  • Plan layout.  Attach all main pieces to card with Dimensionals.
  • Cut out several "peppermints" from DSP.  Attach 3 to front.
  • Add White piece to inside.
  • Cut "border" from Real Red.  Trim and attach to bottom.  Add 3 "peppermints" to inside as well.
  • Finish with Acrylic Gingerbread Embellishments and Red Rhinestones.
Product List

Thursday, October 14, 2021

Peppermint Kisses

I fell in love with the "traditional" red & white peppermint card using the Scallop Contour Dies and awesome, versatile Gingerbread & Peppermint DSP. So many images can be cut directly from the DSP, but I chose to "make" my peppermints using cardstock and dies!!  

Measurements:    

  • Basic White: 1/2 sheet, 3 1/2" x 4 3/4", 1 1/2" x 2 3/4" (label), scraps
  • Real Red: 1/4 sheet, scraps
  • Gingerbread & Peppermint DSP: 2 3/4" x 4"
To Make This Card:

  • Run Real Red piece through largest scallop die. Then, run the White piece through the next size, and lastly, the DSP with the next size.
  • Attach the Real Red to folded Basic White card base. Then, add White layer. The DSP piece is popped up with Dimensionals.
  • Stamp sentiment in Real Red onto piece of White. Cut out with "label" die.  Adhere, flat, to card.
  • Cut one each of peppmints, for a total of 3.  Also cut "detail" from White.  Attach together.
  • Attach to card front with Dimensionals.
  • Finish with Red Rhinestones in center of "peppermints"
Product List

Friday, October 1, 2021

Frosted Gingerbread Mounted Double Gate Fold & Video

I saw this card over on Julie Davison's Thursday Night Therapy. It didn't have a name, so I am calling it a Mounted Double Gate Fold.  It is a version of a Double Gate Fold, but mounted on another support piece. Love the Frosted Gingerbread Bundle!  So many possiblities. So, stay tuned!!


Measurements:    

  • Old Olive: 4 1/4" x 11" (1/2 sheet cut LENGTHWISE), 1/4 piece
  • Gingerbread & Peppermin DSP: 2 pcs @ 7/8" x 4", 2 pcs @ 1 3/4" x 4"
  • Basic White: 3 1/4" x 4" (inside), 2 3/4" square (front), scraps (ornaments)
  • Real Red: 3" square
To Make this Card:

  • Score long sheet at 2" - 3 3/4" - 7 1/4" - 9". Crease well with Bone Folder creating a Double Gate Fold.
  • Mount 2 narrow DSP pieces on either side of 1/4 piece.
  • Place Tear Tape onto back of Double Gate Fold piece.  Attach to base between DSP pieces.
  • Add White piece to the inside.
  • Attach DSP pieces to outside.
  • Stamp images of your choice in Real Red and Old Olive.  Cut out with corresponding dies.  Attach one flush, and the other with Dimensionals.
  • Stamp sentiment in Real Red.  Cut around in narrow rectangle.
  • Stamp sentiment inside in Real Red.
  • Stamp "peppermints" in Real Red and Old Olive.  Cut out with corresponding die and add a few to inside of card.
  • Finish with scattered Wonderful Gems

Product List