Tuesday, January 25, 2022

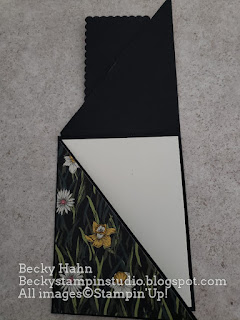
Diagonal Daffodil Fold

Here is a fold that I haven't done in a LONG time. It's a diagonal cut fold.  You take a full sheet of cardstock and cut it in half, diagonally making 2 cards with the same cut. I used the FREE SAB DSP, Daffodil Afternoon, which was perfect for this card fold! Along with the coordinating Daffodil Daydream Bundle.  


Measurements:  

  • Basic Black: full sheet cut in half DIAGONALLY, 2 3/4" x 4"
  • Very Vanilla: 4" x 5 1/4", 2" x 3 1/4", scrap
  • Daffodil Afternoon DSP: 2 prints @ 4" x 5 1/4" cut diagonally (you will only need 1/2 of each) the other half will make another card.
To Make This Card:

  • Cut full sheet of cardstock in half Diagonally.  
  • You can fold by either folding points into place an creasing with a bone folder, or you can place into a paper trimmer or score board and score the lines at 4 1/4" and 5 1/2" anc then creasing with bone folder.
  • Attach DSP to each diagonal fold.  It will have a 1/16" -1/8" border.  Note: be aware of any directional patterns! With these daffodils, the matching card will have the DSP pieces switched so the daffodils can remain upright.
  • Cut Stitched Scalloped Rectangle from the 3rd largest Color and Contour dies. Attach the cut Very Vanilla piece on top.
  • Stamp single "daffodil" onto scrap of Vanilla.  Color in with Blends as shown.  Cut out with corresponding die.  Attach to rectangle with Dimensionals.
  • Now, attach this rectangle to one diagonal piece. i.e. HALF of the rectangle.  Note: this will not go from corner to corner of the rectangle. I don't know why...
  • Attach Vanilla piece inside card.  FInish as desired.
  • Finish outside with bow of Bumblebee Ribbon and scattered InColor Bumblee Dots.
Product List

Monday, January 24, 2022

Blended/Masked Flowers

I was seeing some lovely butterflies and flowers on card samples, and had no idea where they were coming from... Well, they were coming from a new set of Decorative Layering Masks from the January-June Mini Catalog. They are gorgeously fun!!  So many color possibilities!!  This would make a good instructional video as well!!  So, stay tuned!!  This one uses 2 shades of pink/purple to make the delicate flowers.  I mounted it on some pretty DSP from the FREE SAB Friendly Hello DSP.

Measurements:  

  • Fresh Freesia: 1/2 sheet
  • Friendly Hello DSP (N) (SAB): 4" x 5 1/4"
  • Basic White: 3 1/2" x 4 3/4"
To Make This Card:

  • Attach DSP to folded Fresh Freesia card.
  • Cut 2nd largest scalloped rectangle from White piece.
  • Attach "detailed" mask to White piece with removable tape.  Apply lightest ink color to mask with Blending Brush, using a circular motion. Remove mask.
  • Next, move mask to larger floral image.  Line up center circles and attach over sponged image with removable tape. Apply next shade of ink to mask with Blending Brush using circular motion. Remove mask.
  • Now, we'll add some "greenery".  There are 2 different types of greenery.  Select your desired "leaves" or mix and match.  You will move the "greenery" mask around to match the curves of your flowers.  Tape down, and repeat as above.
  • Note: you can easily re-sponge or add additional color simply by realigning mask!
  • Attach finished piece over DSP, with Dimensionals.
  • Finish with new, InColor jewels.
Product List

Saturday, January 22, 2022

Bouquet of Love Hybrid Embossing Folder

I'm baack (I hope).  Mom and I got together to play yesterday and made 5 cards!! This one was probably our favorite and features our new Bouquet of Love Hybrid Embossing Folder.  It's absolutely GORGEOUS and so easy to get fabulous results!  This one is my favorite Book Binder Fold along with a little soft Blending Brush color! Stay tuned!!  Hmm this just might make a good early video!!

Measurements:  

  • Basic White (or Thick Basic White) 1/2 sheet cut LENGTHWISE, 4" x 4", 1" x 4", 3" x 3
To Make This Card:

  • Fold White Base in half.  Score FRONT 1 1/4" from fold.  Crease well.
  • Attach Tear n Tape under this 1 1/4" and attach to card creating a "Book Binding".
  • Take larger square and run it through the Embossing folder, centering "heart" image.
  • Take smaller Square and run through Embossing Folder with DIE.  Save the embossed, die cut heart  for this project.
  • Take the 1" strip and Emboss using the side of the Folder, avoiding the "heart".
  • Attach this strip to the front of card.
  • Attach the embossed strip with the Heart onto the front as well.
  • Now take the cut and embossed heart and lightly add Petal Pink ink to the front with Blending Brush. Then attach to front of card, over embossed heart, with Dimensionals.
  • Finish with a wrapped knot of Petal Pink sheer ribbon and several scattered, new Polished Dots.
Product List

Monday, January 17, 2022

Framed Grassy Grove

This was actually one of the first cards I made with the Grassy Grove Bundle. I liked the fact that it cuts down the "window" die.  I was pleased with the results!  

Measurements:  

  • Basic Black: 1/2 sheet, 3 1/2" x 4", 3 1/4" x 3 3/4", scrap
  • New Horizons (N): 4" x 5 1/4" (pale papaya swirl), 3 1/4" x 3 3/4" (scenery)
To Make This Card:

  • Attach larger DSP to folded Black card. (I used a pattern from the Hand Penned DSP, but there is also an awesome piece of swirl that would be great, too).
  • Center the "window grove" over the smaller Black piece.  Cut the tree opening the best you can, having tree "trunks" at the outside edges.
  • Attach this "window tree" piece to DSP.  Then "frame" this piece with the last Black piece.
  • Attach all to card, where desired.
  • Before you finish.  Cut deer from scrap of Black, or scrap you removed from "window".
  • Stamp sentiment of your choice in black over to the side.
Product List

Sunday, January 16, 2022

Another Cute Ladybug

I'm relying, once again, on my Mom's creation!  This is another darling Ladybug using the Ladybug Builder Punch and Host Pattern Party DSP!  She's also added the non-Stampin' Up! sentiment die from Creative Expressions.


Measurements:  

  • Real Red: 1/2 sheet, scrap, 2" x 3" (die cut)
  • Pattern Party (H): 4" x 5 1/4" (diagonal stripe)
  • Basic White: 2 3/4" x 4"
  • Basic Black: scrap
To Make This Card:

  • Attach DSP to folded Real Red card.
  • Cut stitched, scalloped rectangle from Basic White.  Stamp or add sentiment of your choice.
  • Punch "ladybug body" from strip of Black.  Punch "ladybug wings" from Real Red.j Attach together and add to card with a Dimensional.
  • Add Rhinestone "spots" to "ladybug wings" and 4mm googlie eyes.
  • Finish by scattering Black Rhinestones
Product List