Saturday, December 4, 2021

Picture This Trees

I just love the Picture This dies!  There are SO MANY ways to use them.  I love them for a background with some interesting DSP behind!  For this one, I used the versatile Whimsical Trees with the rectangle Picture This die!  There are so many options for the trees!


Measurements:    

  • Mint Macaron: 1/2 sheet
  • Whimsy & Wonder DSP (N): 4" x 5 1/4" (mint print) , 1" x 4" (stripe)
  • Basic White: 4" x 5 1/4", 2" x 4" (lg tree overlay), 1 1/4" x 2 1/4" (sm tree)
  • Just Jade: 2" x 4"
  • Evening Evergreen: 2 1/4" x 5"
  • Silver Foil: 2 1/4" x 5"
To Make This Card: 

  • Attach DSP to Mint Macaron card base.
  • Cut "rectangle" windows from White with Picture This die. Attach to card front with Dimensionals.
  • Use snips and "flag" stripe DSP. Attach to card as shown.
  • Cut tall tree from Evening Evergreen. 
  • Cut tall "overlay" from White.  Attach to Evergreen Tree.  Adhere to card.
  • Stamp "scribble tree" in Evening Evergreen onto piece of Just Jade.  Cut out with corresponding die.
  • Cut larger "garland" from Silver Foil. Add to tree and trim bottom.  Adhere to front of cad.
  • Stamp "feathered tree" in Evening Evergreen onto scrap of White. Cut out with corresponding die.  Add to card with Dimensionals.
  • Cut "ornaments" from scrap of Silver Foil.  These are so neat, they are even a little rounded!!  I attached these to the large tree with Mini Glue Dots.
  • Stamp sentiment in Evening Evergreen into upper "window".
  • Add Mint Macaron bow to top of big tree.
  • Finish with clear Rhinestones on the top of trees and scattered in window!
Product List

Friday, December 3, 2021

Little Village Side Pull Out Card

I just love this Little Village from the Classic Cloche stamp set! I thought I would pair it with a traditional Side Pull Out Card using the Layering Circle Dies.  (Hmmm, I wonder if I could have used the Cloche die.  Might need to try that!) And of course the gorgeous Whimsy & Wonder DSP!


Measurements:  

  • Blushing Bride: 1/2 sheet
  • Whimsy & Wonder DSP (N): 4" x 5 1/4" (snowflakes), 1 7/8" x 5" (holly)
  • Basic White: 5 1/4" x 8", 2 3/4" square, 3/4" x 3 1/8" (sentiment)
  • Silver Foil: 3 1/4" square (scalloped circle), 3" square (inside smooth circle), 1 1/8" x 3 1/4"
To Make This Card 
  • Fold Basic White card base in half. Attach Stnowflake DSP quarter to front along outside edges only.
  • Cut smooth circle through both layers on front of card.  Discard these pieces.
  • Layer this smooth circle die inside coordinating scallop circle die, and cut from largest Silver Foil square.  You will not need the center circle. Attach this silver scalloped "frame" to the front of card, around the circle.
  • Stamp the "little village" in Basic Gray ink onto square of White.  Cut out with circle you just used for the front opening. 
  • Stamp the detail on the village.  I used Mint Macaron for the "trees" and Basic Gray for the "buildings".  I stamped away, but I wish it was just a little darker... I also stamped some light snowflakes using the stamp from the Peaceful Cabin, but use any snowflake stamp you might have.
  • Now, select a little larger circle, and cut a circle from the other Silver Foil Square. Layer with the White "village" circle. Set aside for the time being.
  • Fold Basic White card in half, and then again in half, back on itself, creating a "Z" fold. Crease well. Flip over so the "Z" is on the right, and adhere "base" to inside of Blushing Bride.card. Attach other DSP strip to inside narrow panel.
  • Adding the circles is a little different for this card. You still close card.  Place adhesive on part of the "z" fold that is showing through the rectangle.
  • But, instead of replacing the cut out through the circle, you will need to approach it from the BACK side, centering the circle in the created "window" and attaching the silver circle to the inside flap, where you have already placed the adhesive.
  • Stamp sentiment in Basic Gray onto narrow rectangle piece. Attach to Silver strip and add to card with Dimensionals.
  • Finish with White Glitter bow, and a stamped sentiment inside of your choice with Basic Gray. Oh, and some scattered Rhinestones.
Product List

Thursday, December 2, 2021

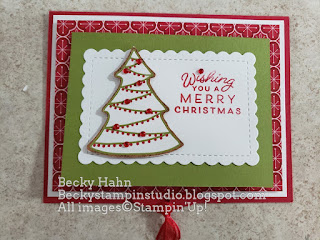
Pull Tab Flip Gift Card Holder

I love to make these cards, but haven't done one in a while, as the Classic Label Punch that we used for the Pull Tab has retired.  Well, you CAN use a narrow die of your choice, OR the Classic Label Punch is currently on sale in the Clearance Rack!!  I have never done one with a landscape orientation or with a larger flip.  So, here is my version that I also made into a Gift Card Holder....a "Becky Original".


Measurements:  

  • Real Red: 1/2 sheet, 2" x 6" (pull tab), 2 3/4" x 4"
  • Old Olive: 3 1/4" x 4 3/8"
  • Basic White: 4" x 5 1/4", 2 pcs @ 2 3/4" x 4"
  • Heartwarming Hugs DSP (N): 3 3/4" x 5"
  • Gingerbread & Peppermint DSP (N): 1 5/8" x 3 7/8" (stripe), die cuts - tree, mints
To Make This Card:

  • Attach Basic White piece to folded Real Red card. 
  • Score "pull tab" at 2" and 2 1/2".  Crease well with Bone Folder.  Punch Tag Punch along "longer" end.
  • Center Classic Label Punch (or use a  long, narrow die of your choice) along long side of DSP, push in all the way. Punch.  This needs to be roughly in 2" for this fold.
  • Crease along first score line.  
  • Place Seal+ (Tear & Tape) along 1/2" area between score lines.  Center & attach the Olive rectangletear, lining cut edge to scored line.
  • Now, insert Pull Tab through the punched slit. Pull until the Olive piece flips up. Place Tear & Tape on the exposed Red Pull Tab, near the crease.  Attach Red Rectangle to Pull Tab.
  • Place Seal+ (Tear & Tape) on underside of Red rectangle. Center this piece in center of card, and attach attach to DSP.
  • Pop up DSP with "pull tab" using Dimensionals.  Be sure to keep Dimensionals away from sliding "pull tab".  Attach to card front. Check to make sure the Pull Tab still works!
  • Cut 2 Stitched Rectangles from Scalloped Contour Dies. Attach one to the inside on the Old Olive piece.  Add a couple die cut mints.  This is where you can write your message!
  • On the Red, inside piece, attach DSP "pocket" with 1/8" Tear & Tape.  Decorate with a few more die cut mints.  Tuck your gift card here!
  • On the other White rectangle, stamp sentiment in Real Red in upper Right corner. Attach to Old Olive front.
  • Fussy cut a tree, and attach to White piece with Dimensionals.
  • Finish by attaching small piece of Sheer Red Ribbon to Pull Tab, and decorate tree with Red Rhinestones!
Product List

Wednesday, December 1, 2021

Snowflake Faker Shaker

I saw a version of this Faker Shaker and knew I had to try it!  These are so fun to do! All it takes is a clear envelope (that we do sell), a piece of DSP, and something to shake. This DSP is so pretty, as are the Wonderful Snowflakes!

Measurements:   

  • Blushing Bride: 1/2 sheet
  • Whimsy & Wonder DSP (N): 4" x 5 1/4" (snowflakes)
  • Silver Foil: 3 1/2" square
To Make This Card:

  • Insert DSP into CLEAR envelope. (Yes, we do still carry these!). Pour in some "sprinkles". Seal the envelope tight around DSP.  Then fold down the side and tape, so it fits tightly arund DSP, too.  You don't want any of those "sprinkles" escaping!!
  • Wrap Blushing Bride Ribbon around this piece and tie in a knot.  Attach this piece onto folded Blushing Bride card.
  • Cut medium "doily" from Silver Foil.  Attach Wonderful Snowflake to "doily" with Glue dot.  Then, attach this to card, over ribbon, with Dimensionals.
  • Finish with Opal Round in center of "snowflake".
Product List